ラズパイで作る自宅WEBサーバ:nginx編
第7回 認証サーバ設定
2026.10.31
ここでは、まず自己認証によるテストを行い、次にLet's Encryptが提供する無料DV(Domain Validation)ドメイン認証 SSL証明書を取得・自動更新設定を行います。
自宅公開WEBサーバとして Certbotを使うためには、事前にドメインの取得と固定IPアドレスの取得が必要です。
●自己認証
まずはテスト用途としての自己認証サーバの設定です。
自己認証局(CA)によるサーバ証明書とは、自分で構築した認証局(CA)が発行するSSL/TLS証明書のことで、開発環境や社内ネットワークで使われますが、ブラウザはデフォルトで信頼しないため警告が出ます。
ドメインおよびサブドメインを含めた一括認証設定を行います。
OpenSSL の req コマンドで秘密鍵(.key)とCSR(証明書署名要求 .csr)を同時に作成します。
秘密鍵
(Private Key): |
サーバーの内部だけで厳重に保管し、暗号を復号(元に戻す)するために使う機密データ。 |
CSR
(Certificate Signing Request): |
SSL/TLS証明書を発行してもらうために、認証局(CA)へ提出する申込書(公開鍵やドメイン名が含まれる)。 |
$ sudo mkdir -p /etc/nginx/ssl
$ cd /etc/nginx/ssl
$ sudo openssl req -x509 -new -newkey rsa:2048 -nodes \
> -keyout private.key \
> -out public.csr
※ -nodes:秘密鍵にパスフレーズを設定しない(サーバー運用向け)
※ RSA 2048ビット以上を推奨。3072ビットや4096ビットも利用可能
対話形式で情報の入力を行います。
Country Name (2 letter code) [AU]: JP
State or Province Name (full name) [Some-State]: Tokyo
Locality Name (eg, city) []: Chiyoda-ku
Organization Name (eg, company) [Internet Widgits Pty Ltd]: Example Co., Ltd.
Organizational Unit Name (eg, section) []: IT Department
Common Name (e.g. server FQDN or YOUR name) []: *.example.com ← ドメイン名のワイルドカード
Email Address []:[ENTER]
証明書の確認
$ openssl x509 -in /etc/nginx/ssl/public.csr -text -noout
Certificate:
    Data:
        Version: 3 (0x2)
        Serial Number:
            34:cf:b3:e5:54:c2:7c:ef:41:c5:1f:d4:d7:d5:70:9c:91:1f:89:be
        Signature Algorithm: sha256WithRSAEncryption
        Issuer: C=JP, ST=Tokyo, L=Chiyoda-ku, O=Example Co., Ltd., OU=IT Department, CN=*.example.com
        Validity
            Not Before: Jul  8 02:21:27 2026 GMT
            Not After : Aug  7 02:21:27 2026 GMT
        Subject: C=JP, ST=Tokyo, L=Chiyoda-ku, O=Example Co., Ltd., OU=IT Department, CN=*.example.com
        Subject Public Key Info:
            Public Key Algorithm: rsaEncryption
                Public-Key: (2048 bit)
                Modulus:
                    00:e2:6c:fc:84:2b:af:04:4f:ed:db:8d:78:53:23:
                    f8:e5:cf:6c:38:df:e3:07:34:72:18:41:95:d7:88:
                    f1:b7:ba:32:c9:93:96:c1:ec:de:cb:16:14:a9:23:
                    02:19:59:c8:56:90:d3:de:8e:e1:38:1f:35:be:17:
                    e0:6b:14:7c:31:f9:2e:75:ec:fa:f0:84:9c:21:ce:
                    10:8d:37:83:89:65:f7:2a:58:22:e7:de:94:63:5e:
                    41:33:c4:a3:52:c1:b0:c1:5e:30:b3:99:6c:52:62:
                    4d:e8:be:25:46:67:d4:0a:50:ed:2a:6e:5c:2a:22:
                    7e:8c:b9:f7:82:cd:50:91:aa:75:54:f6:2f:09:c1:
                    23:10:ae:44:35:d1:dc:cb:18:d9:43:fd:2b:3c:53:
                    b2:61:df:03:24:33:78:4d:e9:42:8c:63:80:c0:52:
                    c9:e2:14:6c:06:49:8f:53:49:3e:49:da:cc:76:42:
                    ce:bf:e2:d6:f2:05:c6:50:a9:4a:f8:c7:12:1e:54:
                    e3:46:8c:5a:dc:72:f0:31:e3:8d:0c:1c:02:d8:42:
                    0e:c0:fe:c7:c1:28:37:a6:16:bd:b3:83:18:67:77:
                    7f:3f:12:66:4e:17:3c:e2:6e:d5:87:46:f2:37:1c:
                    99:63:3e:39:aa:85:d1:12:76:bd:18:ea:e4:82:1c:
                    70:ab
                Exponent: 65537 (0x10001)
        X509v3 extensions:
            X509v3 Subject Key Identifier:
                23:2c:d4:b1:5e:c2:dd:b4:78:14:d0:4c:6c:34:1a:5f:cc:56:5a:35
            X509v3 Authority Key Identifier:
                23:2c:d4:b1:5e:c2:dd:b4:78:14:d0:4c:6c:34:1a:5f:cc:56:5a:35
            X509v3 Basic Constraints: critical
                CA:TRUE
    Signature Algorithm: sha256WithRSAEncryption
    Signature Value:
        c9:e4:14:46:b4:bc:d7:65:4a:23:74:cf:38:30:b1:d2:d4:54:
        cf:0b:4a:94:cc:10:1c:86:31:d6:b9:ed:b6:80:30:e9:fa:0c:
        29:24:70:c3:31:03:c7:de:e8:b0:70:85:b7:64:eb:13:54:a6:
        a1:cd:30:d1:58:53:b8:6f:d1:1a:a6:47:5e:58:86:88:fc:c6:
        3f:6e:c2:d8:25:e8:7d:15:00:1e:ab:ac:46:ac:fd:e0:65:14:
        52:4c:06:b2:b9:5a:1f:88:4a:b4:0a:d9:36:95:5b:95:b7:dc:
        d0:06:2e:9d:c0:2b:02:d5:f2:52:a5:84:70:e9:47:70:8a:24:
        65:f6:fa:c1:00:63:ec:8a:f0:8b:e2:87:44:54:33:c9:da:bb:
        00:18:fd:17:03:e2:32:17:27:cd:82:87:6d:74:49:bd:83:d4:
        c2:00:4e:8b:f3:ee:25:06:81:b8:25:50:1d:99:55:67:5a:40:
        37:ce:a1:92:db:4f:b6:2e:82:cf:84:80:c0:ed:57:82:0b:5b:
        70:0a:c1:f6:0f:24:ba:ce:52:be:60:57:93:ec:70:42:7d:11:
        51:14:9c:0b:cf:65:b9:d2:34:45:b3:4e:01:53:6b:89:91:fe:
        f5:fe:4c:30:84:1d:49:7d:a7:de:6f:09:f7:3e:93:95:3c:96:
        34:d5:82:5d
ファイル属性を変更します
$ sudo chown www-data:www-data -R /etc/nginx/ssl/
$ sudo chmod 600 /etc/nginx/ssl/*
$ sudo chmod 700 /etc/nginx/ssl
Nginx設定ファイルのserver セクションを追加します。
$ sudo vi /etc/nginx/nginx.conf
server {
	listen 443 ssl;
	server_name example.com;
	root  /example/www;

	ssl_certificate /etc/nginx/ssl/public.csr;
	ssl_certificate_key  /etc/nginx/ssl/private.key;

	# TLSプロトコルと暗号スイートの指定
	ssl_protocols TLSv1.2 TLSv1.3;
	ssl_ciphers HIGH:!aNULL:!MD5;

	# SSL Session Cacheを有効にする
	ssl_session_cache shared:SSL:5m;  # cache:5MB
	ssl_session_timeout 5m;           # 5 minutes

	location / {
		root   /example/www;
		index  index.html index.htm;
	}
}
テスト用のHTMLファイルを作成します
$ vi /example/www/index.html
<html><body>Hello, World!</body></html>
nginxを再起動して、WEBブラウザからhttpsでアクセスします。
$ sudo nginx -t
$ sudo systemctl restart nginx
https://example.com/index.html
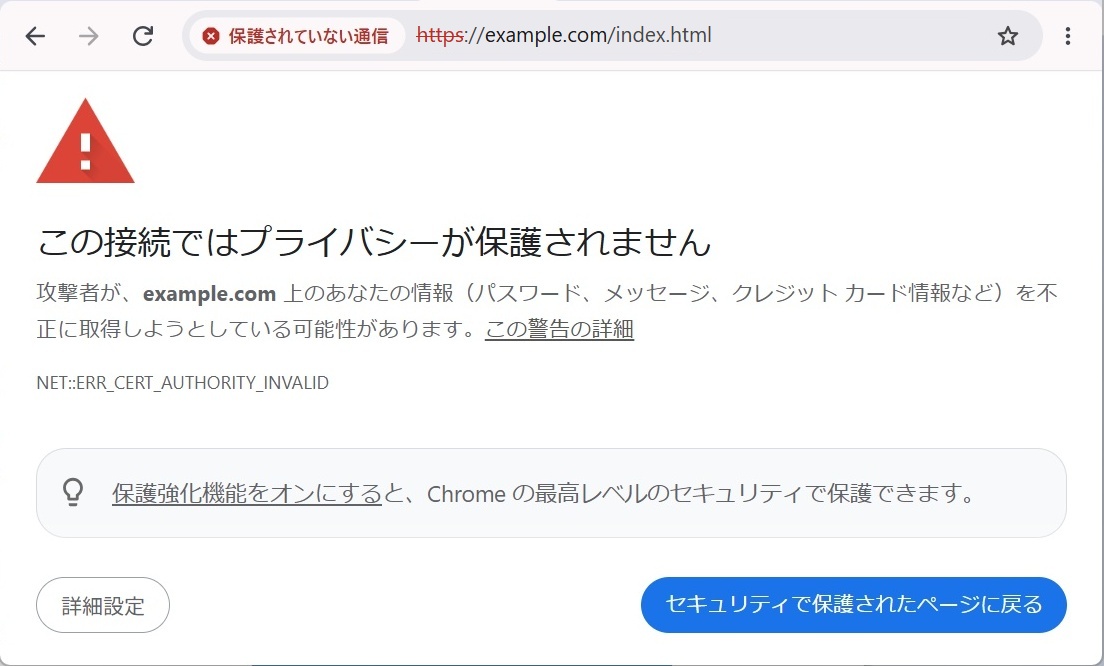
自己認証のWEBサーバへGoogle Chromeでアクセスすると、アドレスバーの「https:」の部分に赤い二重の取り消し線が表示されます。
これはアクセスしたウェブサイトのSSL/TLS証明書に問題があり、「この接続ではプライバシーが保護されません」という危険な状態(エラー)を警告しています。
画面左下の「詳細設定」をクリックします。
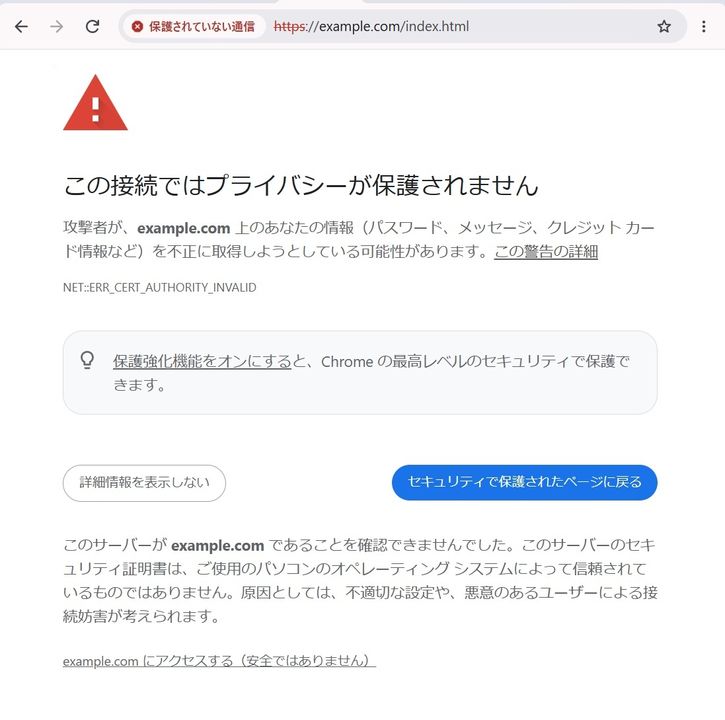
「example.com にアクセスする(安全ではありません)」をクリックします。
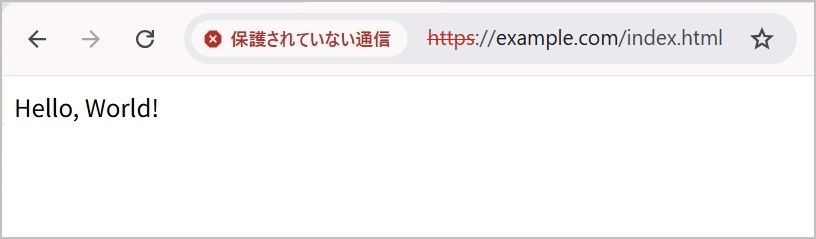
HTTPS経由でHTMLファイルが表示されます。
次に公開サイトにおける認証設定を行います。
●Certbot(Let's Encrypt)自動更新設定
第三者認証局が発行する証明書はブラウザにあらかじめ信頼されたルート証明書によって検証され、
警告なしで安全な通信(HTTPS)を提供します。
Certbot は Let's Encrypt が提供する無料 DV SSL(ドメイン認証型SSL証明書)を取得・自動更新するためのツールです。
DV SSLは、Webサイトのドメイン名の所有権を確認するだけで発行される、最も手軽なSSL/TLSサーバー証明書です。
運営している企業や団体の審査はなく、ドメインを使えていることの確認のみで発行されます。
自宅WEBサーバとして Certbotを使うためには、事前にドメインの取得と固定IPアドレスの取得が必要です。
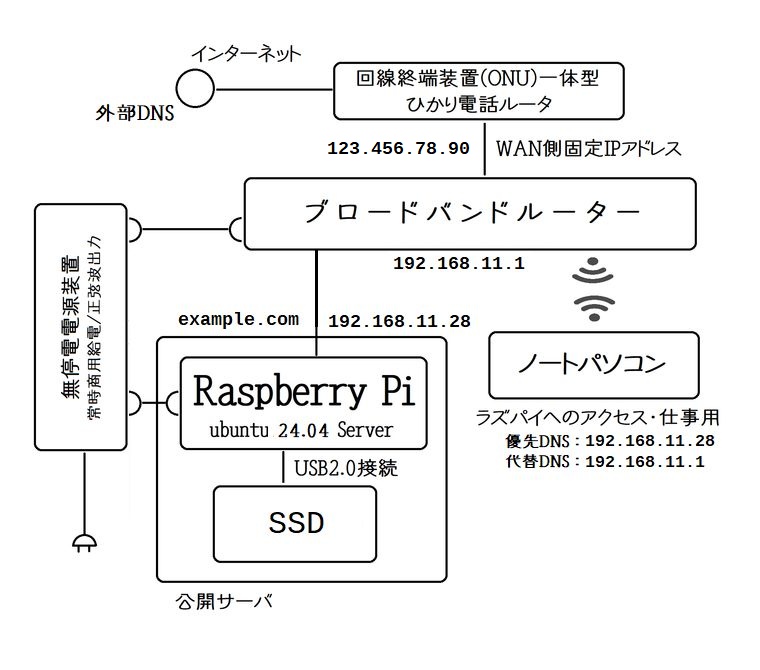
固定IPアドレスの取得
まずは、固定IPアドレスの取得に関してです。
固定IPアドレスを取得する際には、利用している回線に対応しているサービス提供業者を選択しましょう。
GMOとくとくBB フレッツ光ファミリー 固定IP付接続サービスは、WEB申込みでクレジット決済であれば、早ければ当日に固定IPアドレスを取得できます。
手続きが完了すると、固定IPアドレスと接続ID、接続パスワードが通知されます。
ブロードバンドルータ側でIDとパスワードを設定することにより、開通します。
固定IPアドレスとブロードバンドルーターの紐づけ
旧式のバッファローのブロードバンドルータでの設定はフレッツ光の場合、下記のような流れになります。
設定には、プロバイダから提供された接続IDと接続パスワードが必要です。
TOP・インターネット接続を行う→Internet回線の自動判別が行われる→[PPPoE再設定を行う]
→[NTT東日本]を選択し、[進む]をクリック→フレッツ・スクウェア接続[NTT東日本]→[進む]
→「接続成功です」と表示されたら、[設定完了]をクリック
DNS設定
次にドメインの取得は、ドメイン登録業者いわゆるレジストラに申請します。
レジストラ(ドメイン登録業者)の代表格の、「お名前.com」では「お名前.com Navi」からDNS設定を行います。
また、お名前.comさんでは、お名前メールというサービスがあるようです。メールサーバーの設定は複雑ですので、メール機能はお名前メールに任せ、WEBサービスのみを自宅サーバーで運用するような形態を考えるのもよいかもしれません。
●Certbot のインストール
$ sudo apt install -y snapd
Ubuntu 24.04 LTS では snap パッケージによるインストールが公式推奨です。
snapd(Snap daemon)は、UbuntuなどのLinux環境で「Snap」と呼ばれるソフトウェアパッケージを管理・実行するためのバックグラウンドサービスです。
依存関係を気にせず、アプリを簡単にインストール・アップデートできるのが特徴です。
主な特徴
- 自己完結型のパッケージ: 動作に必要なライブラリなどがすべてパッケージ内にまとめられているため、OSのバージョンや他のソフトウェアに影響されずに動作します。
- ディストリビューション間の互換性: snapd がインストールされていれば、Ubuntu、Debian、Fedoraなど、多様なLinux環境で同じようにアプリを導入できます。
- 自動アップデート: バックグラウンドで自動的に最新バージョンへと更新される仕組みになっています。
snap を使ってインストールします。apt 版は古いため使用しないでください。
$ sudo snap install --classic certbot
システム全体へのアクセス権限(--classic)を付与してインストールを実行します。
$ sudo ln -s /snap/bin/certbot /usr/bin/certbot
$ certbot --version
certbot 5.7.0
●ポート・マッピング設定
Certbotは証明書を発行する際、サーバが存在するか確認しています。
ブロードバンドルータのポートを解放します。
下記のアドレス設定を例に説明します。
Internet側IPアドレス:123.456.78.90
LAN側IPアドレス:192.168.11.28
| Internet側IPアドレス | プロトコル(ポート) | LAN側IPアドレス |
| 123.456.78.90 | HTTP(TCPポート:80)
←────────────→ | 192.168.11.28 |
| 123.456.78.90 | HTTPS(TCPポート:443)
←────────────→ | 192.168.11.28 |
ブロードバンドルーターの443ポートをWEBサーバに割り当て、外部からドメイン名でアクセスできるようにします。
また、証明書の取得・更新のために、80ポートも開放しておく必要があります。
認証方式(HTTP-01チャレンジ)
Certbotが証明書を取得・更新する際、Certbot(Let's Encrypt)のサーバーが、 http://<あなたのドメイン>/.well-known/acme-challenge/ にアクセスして所有権を確認するため、ポート80の開放が必須となります。
●証明書の取得(Nginx プラグイン)
Nginx が動作中の状態で実行します。
ここでは、サブドメインも含めています。
$ sudo certbot --nginx \
> -d example.com \
> -d sub1.example.com \
> -d sub2.example.com
対話形式でメールアドレスと利用規約への同意を求められます。
Saving debug log to /var/log/letsencrypt/letsencrypt.log
Enter email address or hit Enter to skip.
 (Enter 'c' to cancel): admin@example.com

- - - - - - - - - - - - - - - - - - - - - - - - - - - - - - - - - - - - - - - -
Please read the Terms of Service at:
https://letsencrypt.org/documents/LE-SA-v1.8-July-06-2026.pdf
You must agree in order to register with the ACME server. Do you agree?
- - - - - - - - - - - - - - - - - - - - - - - - - - - - - - - - - - - - - - - -
(Y)es/(N)o: Y

- - - - - - - - - - - - - - - - - - - - - - - - - - - - - - - - - - - - - - - -
Would you be willing, once your first certificate is successfully issued, to
share your email address with the Electronic Frontier Foundation, a founding
partner of the Let's Encrypt project and the non-profit organization that
develops Certbot? We'd like to send you email about our work encrypting the web,
EFF news, campaigns, and ways to support digital freedom.
- - - - - - - - - - - - - - - - - - - - - - - - - - - - - - - - - - - - - - - -
(Y)es/(N)o: N


Account registered.
Requesting a certificate for example.com and 2 more

Successfully received certificate.
Certificate is saved at: /etc/letsencrypt/live/example.com/fullchain.pem
Key is saved at:         /etc/letsencrypt/live/example.com/privkey.pem
This certificate expires on 2026-11-30.
These files will be updated when the certificate renews.
Certbot has set up a scheduled task to automatically renew this certificate in the background.

Deploying certificate
Successfully deployed certificate for example.com to /etc/nginx/nginx.conf
Successfully deployed certificate for sub1.example.com to /etc/nginx/nginx.conf
Successfully deployed certificate for sub2.example.com to /etc/nginx/nginx.conf
Congratulations! You have successfully enabled HTTPS on https://example.com, https://sub1.example.com, and https://sub2.example.comp

- - - - - - - - - - - - - - - - - - - - - - - - - - - - - - - - - - - - - - - -
If you like Certbot, please consider supporting our work by:
 * Donating to ISRG / Let's Encrypt:   https://letsencrypt.org/donate
 * Donating to EFF:                    https://eff.org/donate-le
- - - - - - - - - - - - - - - - - - - - - - - - - - - - - - - - - - - - - - - -
手続き完了後、/etc/letsencrypt/live/example.com/ に証明書が配置されます。
$ sudo ls -al /etc/letsencrypt/live/example.com
lrwxrwxrwx 1 root root cert.pem -> ../../archive/example.com/cert1.pem
lrwxrwxrwx 1 root root chain.pem -> ../../archive/example.com/chain1.pem
lrwxrwxrwx 1 root root fullchain.pem -> ../../archive/example.com/fullchain1.pem
lrwxrwxrwx 1 root root privkey.pem -> ../../archive/example.com/privkey1.pem
Certbot は Nginx の設定を自動で書き換え、HTTPS リダイレクトも設定しています。
$ sudo vi /etc/nginx/nginx.conf
server {
	if ($host = example.com) {
		return 301 https://$host$request_uri;
	} # managed by Certbot

	listen 80;
	server_name example.com;
	return 301 https://$host$request_uri;
}
server {
    listen 443 ssl;
    server_name example.com;
    root    /example/www;

    location / {
        root   /example/www;
        index  index.html index.htm;
    }

    ssl_certificate /etc/letsencrypt/live/example.com/fullchain.pem;
    ssl_certificate_key /etc/letsencrypt/live/example.com/privkey.pem;
}
$host はクライアント(ブラウザなど)から送られた値がそのまま入るため、偽装される可能性があります。また、if ディレクティブ自体がNginxでは予期せぬ挙動(If is evil)を引き起こすことがあるため、ドメインごとの振り分けやリダイレクトには if ではなく複数の server ブロックを分ける設定が推奨されています。
●OS全体のIPv6を無効化
サーバー自体でIPv6を無効にすると、Certbotの強制バインドもIPv4のみになります。
$ sudo vi /etc/sysctl.conf
net.ipv6.conf.all.disable_ipv6 = 1
net.ipv6.conf.default.disable_ipv6 = 1
net.ipv6.conf.lo.disable_ipv6 = 1
$ sudo sysctl -p
●証明書の有効期限確認
$ sudo certbot certificates
Saving debug log to /var/log/letsencrypt/letsencrypt.log
- - - - - - - - - - - - - - - - - - - - - - - - - - - - - - - - - - - - - - - -
Found the following certs:
Certificate Name: example.com
Serial Number: 5d48f16ba890369d469b34kti39kerjo188
Key Type: ECDSA
Identifiers: example.com sub1.example.com sub2.example.com
Expiry Date: 2026-11-30 23:18:14+00:00 (VALID: 89 days)
Certificate Path: /etc/letsencrypt/live/example.com/fullchain.pem
Private Key Path: /etc/letsencrypt/live/example.com/privkey.pem
- - - - - - - - - - - - - - - - - - - - - - - - - - - - - - - - - - - - - - - -
●自動更新の確認
Certbot を snap でインストールすると、snap.certbot.renew という systemd タイマーが自動で登録されます。
$ sudo systemctl status snap.certbot.renew.timer
● snap.certbot.renew.timer - Timer renew for snap application certbot.renew
Loaded: loaded (/etc/systemd/system/snap.certbot.renew.timer; enabled; preset: enabled)
Active: active (waiting) since Wed 2026-09-02 09:11:20 JST; 40min ago
Trigger: Wed 2026-09-02 22:11:00 JST; 12h left
Triggers: ● snap.certbot.renew.service
9月 02 09:11:20 ns.example.com systemd[1]: Started snap.certbot.renew.timer - Timer renew for snap application certbot
証明書の自動更新処理に問題がないか、ドライランで確認します。その際にはポート80を開放する必要があります。
$ sudo certbot renew --dry-run
Saving debug log to /var/log/letsencrypt/letsencrypt.log
- - - - - - - - - - - - - - - - - - - - - - - - - - - - - - - - - - - - - - - -
Processing /etc/letsencrypt/renewal/example.com.conf
- - - - - - - - - - - - - - - - - - - - - - - - - - - - - - - - - - - - - - - -
Simulating renewal of an existing certificate for example.comp and 2 more
- - - - - - - - - - - - - - - - - - - - - - - - - - - - - - - - - - - - - - - -
Congratulations, all simulated renewals succeeded:
/etc/letsencrypt/live/example.com/fullchain.pem (success)
- - - - - - - - - - - - - - - - - - - - - - - - - - - - - - - - - - - - - - - -
エラーなく完了すれば、自動更新は正常に動作しています。
認証局にリクエストが集中している場合に、下記のエラーを吐くことがあります。
時間を空けて再度試してみましょう。
$ sudo certbot renew --dry-run
Saving debug log to /var/log/letsencrypt/letsencrypt.log
- - - - - - - - - - - - - - - - - - - - - - - - - - - - - - - - - - - - - - - -
Processing /etc/letsencrypt/renewal/example.com.conf
- - - - - - - - - - - - - - - - - - - - - - - - - - - - - - - - - - - - - - - -
Simulating renewal of an existing certificate for example.com and 2 more
Failed to renew certificate example.com with error: urn:ietf:params:acme:error: rateLimited ::
There were too many requests of a given type :: Service busy; retry later.
- - - - - - - - - - - - - - - - - - - - - - - - - - - - - - - - - - - - - - - -
All simulated renewals failed. The following certificates could not be renewed:
/etc/letsencrypt/live/example.com/fullchain.pem (failure)
- - - - - - - - - - - - - - - - - - - - - - - - - - - - - - - - - - - - - - - -
1 renew failure(s), 0 parse failure(s)
Ask for help or search for solutions at https://community.letsencrypt.org.
See the logfile /var/log/letsencrypt/letsencrypt.log or re-run Certbot with -v for more details.
●手動更新と更新ログ確認
$ sudo certbot renew
$ sudo journalctl -u snap.certbot.renew.service --since "7 days ago"
●参考文献
 Certbot(Let's Encrypt)自動更新設定(Ubuntu 24.04 LTS)
|
 KEYESTUDIO Micro:bit V2ロボットスターターキット (マイクロビットなし) MakecodeとPython用
動き、光と音の使い方、障害物の検知と回避方法、線をたどり、IRリモコンとアプリでコントロールする方法を学びます。
 Maqueen Lite V5 micro:bit ロボットキット STEM用(ライントレース&障害物回避)
Maqueen Lite V5 STEMロボットは、事前調整済みのライントレースアルゴリズム、耐衝撃モーター、開封即使用可能な設計で、ストレスを解消します。
 たいていのことは100日あれば、うまくいく。長田英知著
「時間がなくて、なかなか自分のやりたいことができない」
「一念発起して何かを始めても、いつも三日坊主で終わってしまう」
「色んなことを先延ばしにしたまま、時間だけが過ぎていく」
そこで本書では、そんな著者が独自に開発した、
まったく新しい目標達成メソッド「100日デザイン」について、
その知識と技術を、余すところなくご紹介します。
 まんがで納得ナポレオン・ヒル 思考は現実化する
OLとして雑務をこなす日々に飽き足らず、科学者だった父が残した薬品を商品化すべく、起業を決意した内山麻由(27)。彼女はセミナーで知り合った謎の女性からサポートを得ながら、彼女と二人三脚でナポレオン・ヒルの成功哲学を実践し、さまざまな問題を乗り越えていく。
ヒル博士の<ゴールデンルール>に従い、仕事に、恋に全力疾走する彼女の、成功への物語。
 今日は人生最悪で最高の日 1秒で世界を変えるたったひとつの方法 ひすいこたろう著
偉人の伝記を読むと、最悪な日は、不幸な日ではなく、新しい自分が始まる日であることがわかります。最悪な出来事は、自分の人生が、想像を超えて面白くなる兆しなのです。偉人伝を読むことで、このときの不幸があったおかげで、未来にこういう幸せがくるのかと、人生を俯瞰する視線が立ち上がるのです。
 ご飯は私を裏切らない heisoku著
辛い現実から目を背けて食べるご飯は、いつも美味しく幸せを届けてくれる。
29歳、中卒、恋人いない歴イコール年齢。バイト以外の職歴もなく、短期バイトを転々とする日々。ぐるぐると思索に耽るけど、ご飯を食べると幸せになれる。奇才の新鋭・heisokuが贈るリアル労働グルメ物語!
 【最新版Gemini 3に対応!】できるGemini (できるシリーズ)
Geminiを「最強の知的生産パートナー」として使いこなすための、実践的なノウハウを凝縮した一冊です。
基本的な操作方法から、具体的なビジネスシーンでの活用、日々の業務を自動化するGoogle Workspaceとの連携、さらには自分だけのオリジナルAIを作成する方法まで余すところなく解説します。
 Rustプログラミング完全ガイド 他言語との比較で違いが分かる!
Rustの各手法や考え方を幅広く解説!
500以上のサンプルを掲載。実行結果も確認。
全24章の包括的なチュートリアル。
 ポチらせる文章術
販売サイト・ネット広告・メルマガ・ブログ・ホームページ・SNS…
全WEB媒体で効果バツグン!
カリスマコピーライターが教える「見てもらう」「買ってもらう」「共感してもらう」すべてに効くネット文章術
 小型で便利な Type-C アダプター USB C オス - USB3.1 オスアダプター
Type-C端子のマイコンボードをこのアダプタを介して直接Raspberry Piに挿すことができます。ケーブルなしで便利なツールです。
 Divoom Ditoo Pro ワイヤレススピーカー
15W高音質重低音/青軸キーボード/Bluetooth5.3/ピクセルアート 専用アプリ/USB接続/microSDカード
 電源供給USBケーブル スリム 【5本セット】
USB電源ケーブル 5V DC電源供給ケーブル スリム 【5本セット】 電源供給 バッテリー 修理 自作 DIY 電子工作 (100cm)
|