ラズパイで作る自宅WEBサーバ:nginx編
第3回 Nginxインストール

2026.10.08
ラズパイで作る自宅WEBサーバ:nginx編 第3回は、WEBサーバ nginxをインストールします。
第1回および第2回でサーバ内にDNSを設定したので、レジストラに登録していない任意のドメイン名を使ったサーバ・アクセスが可能になっています。
詳細設定は下記をご覧ください。
 第1回 Ubuntu Server設定
第2回 DNS設定
●nginx インストール
$ sudo apt info nginx
Package: nginx
Version: 1.24.0-2ubuntu7.15
$ sudo apt install nginx
●設定ファイル (/etc/nginx/nginx.conf)
初期状態の設定ファイルを確認します。
$ sudo vi /etc/nginx/nginx.conf
user www-data;
worker_processes auto;
pid /run/nginx.pid;
error_log /var/log/nginx/error.log;
include /etc/nginx/modules-enabled/*.conf;

events {
	worker_connections 768;
}

http {

  sendfile on;
  tcp_nopush on;
  types_hash_max_size 2048;

  include /etc/nginx/mime.types;
  default_type application/octet-stream;

  ssl_protocols TLSv1 TLSv1.1 TLSv1.2 TLSv1.3; # Dropping SSLv3, ref: POODLE
  ssl_prefer_server_ciphers on;

  access_log /var/log/nginx/access.log;

  gzip on;

  include /etc/nginx/conf.d/*.conf;
  include /etc/nginx/sites-enabled/*;
}
Ubuntu系OSでは www-data、RedHat系OSでは nginx がWebサーバーのシステムユーザーとして使われます。
Webサーバーはこのユーザー権限で動作します。
●構文チェックと起動
設定ファイルの構文に誤りがないかチェックします
$ sudo nginx -t
nginx: the configuration file /etc/nginx/nginx.conf syntax is ok
nginx: configuration file /etc/nginx/nginx.conf test is successful
nginx を再起動します
$ sudo systemctl restart nginx
ブラウザから
http://example.com
あるいは
http://192.168.11.28
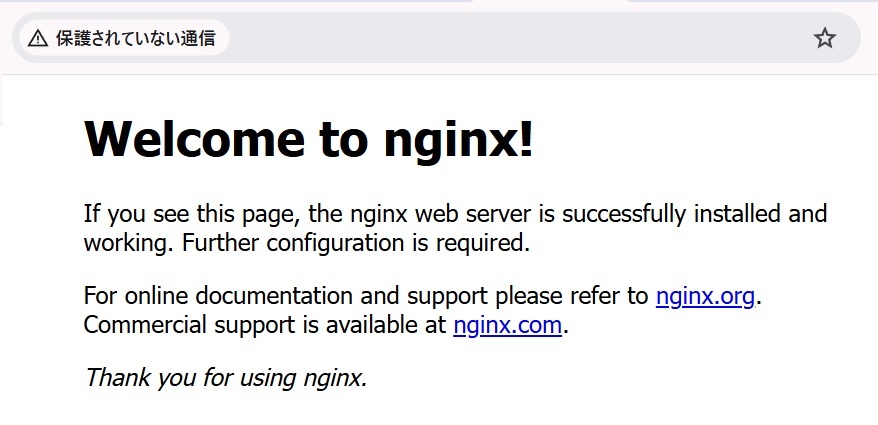
http://example.com はサイトではなく、ローカルエリア内のnginx WEBサーバを指すはずですが、
インターネット上のレジストラに登録されている外部 example.com にアクセスしてしまうことがあります。
●ブラウザが指定したDNSサーバを参照しない場合の対策
ブラウザが指定したDNSサーバを参照しない原因は、OSやブラウザに残るDNSキャッシュ、
またはブラウザ自体の独自DNS機能(セキュアDNSなど)が影響していることがほとんどです。
意図したDNSを参照させるための対処法は以下の通りです。
Google Chromeの「セキュアDNS(DNS over HTTPS)」機能がOSの設定を無視して独自のDNSを参照していること、
またはChrome内部のDNSキャッシュが古い情報を保持していることが主な原因です。
Chromeのアドレスバーに chrome://settings/security と入力します。
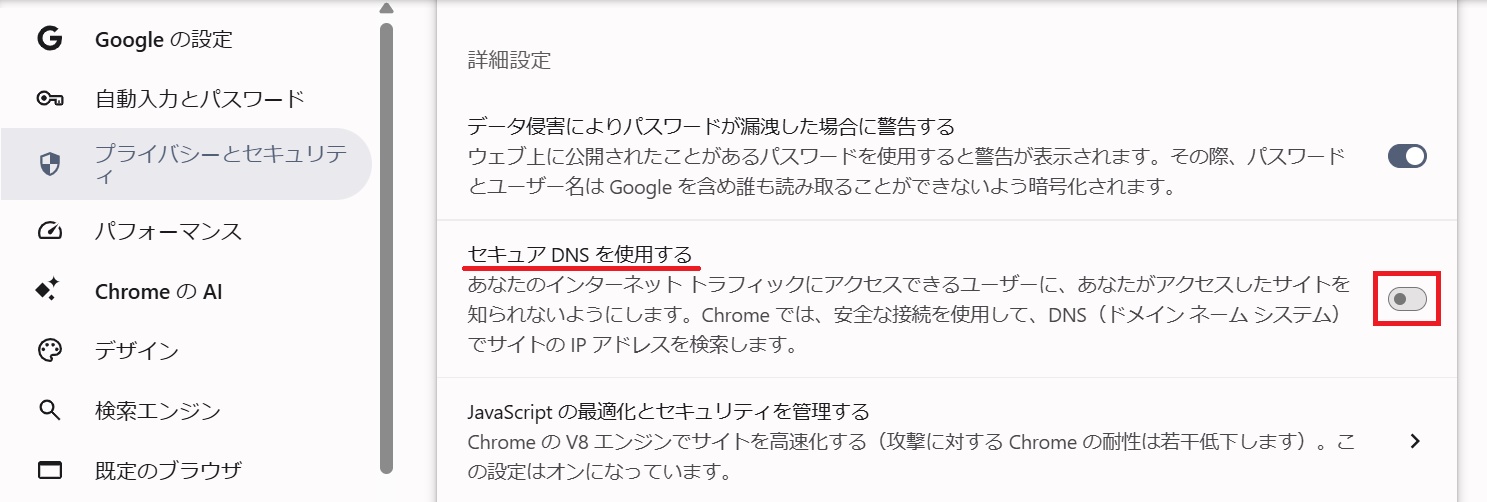
ページ内にある「セキュアな DNS を使用する」の項目を探して、スイッチを「オフ」にし、セキュアDNSを無効化します。
新しいタブを開き、アドレスバーに chrome://net-internals/#dns と入力します。
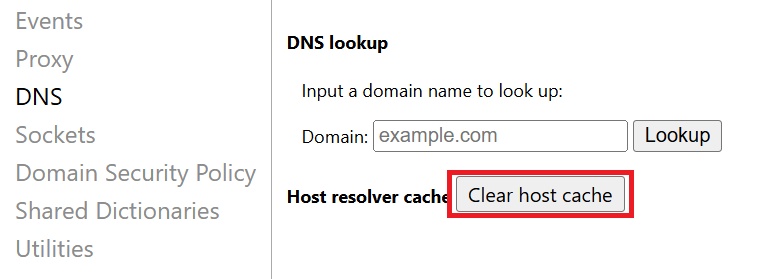
表示されたページにある「Clear host cache」ボタンをクリックします。
Chromeのウィンドウをすべて閉じてから、もう一度起動し直します。
●「http://」でアクセスし直しても自動的に「https://」へ書換えられてしまう場合の対策
example.com は実際にネット上に存在しており、内部DNSに切り替えずに間違ってアクセスしてしまうと、ブラウザにキャッシュされてしまいます。
このサイトにアクセスすると、「http」が「https」にリダイレクトされます。
HSTS(HTTP Strict Transport Security)機能
HSTS(HTTP Strict Transport Security)とは、一度HTTPSでアクセスした際にウェブサーバーからブラウザへ「以降はこのサイトへはHTTPSのみでアクセスする」よう指示するセキュリティ機能です。
この機能が有効になると、ブラウザが設定を記憶するため、ユーザーが「http://」でアクセスし直しても自動的に「https://」へ書き換え(リダイレクト)られます。
開発環境などで一時的にHTTP接続を確認したい場合やHSTSを解除したい場合は、ブラウザの設定やキャッシュをクリアします。
Google Chrome の場合
アドレスバーに chrome://net-internals/#hsts と入力します。
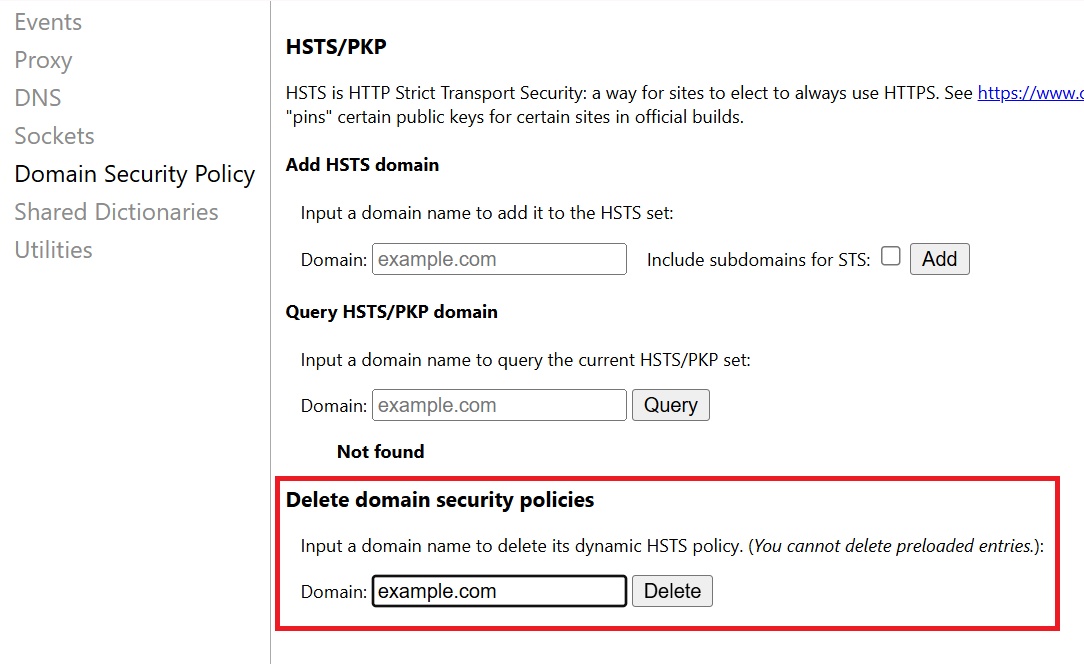
ページ下部の Delete domain security policies 欄にある「Domain」に該当のドメイン名を入力し、Delete ボタンを押します。
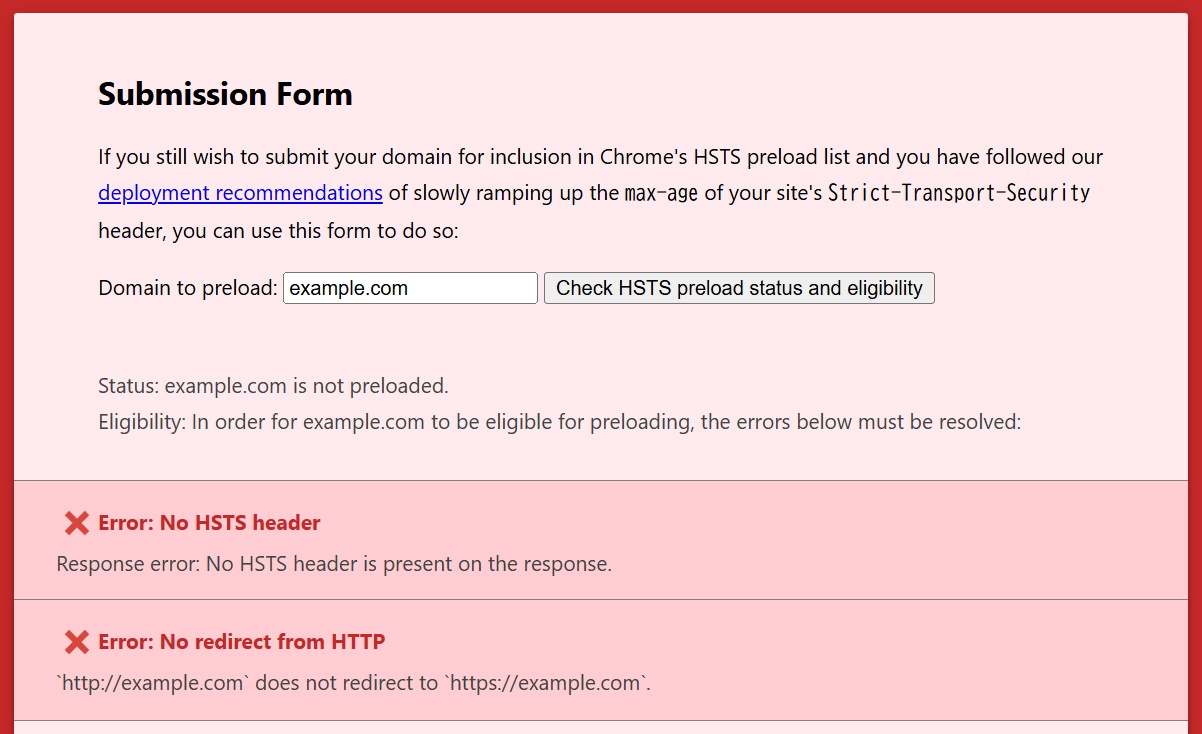
example.com のようなドメインがHSTSプリロードリストに登録されているか確認するには、公式の
HSTS Preload List Submission
サイトでドメイン名を入力します。
●Defaultページの削除
/var/www/html/index.nginx-debian.html が表示されます
$ sudo rm /etc/nginx/sites-enabled/default
$ sudo rm -r /var/www
●ドキュメント・ルートとテストファイル作成
HTMLファイル保存用ディレクトリを作成します
$ sudo mkdir /example
$ sudo chown ubuntu:ubuntu /example
$ mkdir -p /example/www
HTMLファイルを編集します
$ vi /example/www/index.html
<html><body>Hello</body></html>
●設定ファイル編集
$ sudo vi /etc/nginx/nginx.conf
httpコンテキストの最後に、server ブロックを追記します。
この例ではドメイン名のみでアクセスされた際に、indexに指定したファイルが自動的に読み込まれます。
user www-data;
worker_processes auto;
worker_cpu_affinity auto;
pid /run/nginx.pid;
error_log /var/log/nginx/error.log;
include /etc/nginx/modules-enabled/*.conf;

events {
        worker_connections 768;
        # multi_accept on;
}

http {
	..............................
	server {
		listen 80;
		server_name example.com;
		root    /example/www;

		location / {
			index index.html;
		}
	}
}
構文をチェックし、反映させます。
$ sudo nginx -t
$ sudo systemctl restart nginx
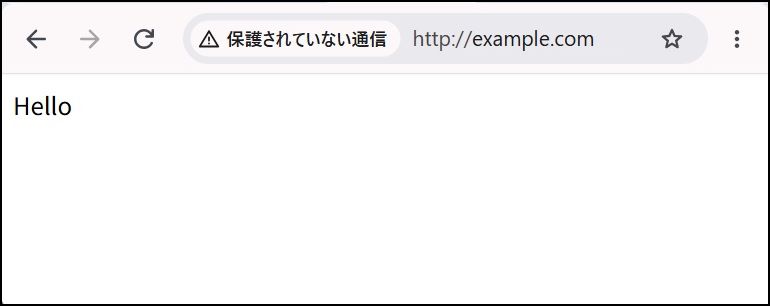
ブラウザから
http://example.com
TELNET端末から
curlコマンドを実行すると、指定したURLのHTMLソースがテキストとして流れます。
$ curl -s http://example.com
<html><body>Hello</body></html>
> output.html を末尾に付けるとファイルに保存できます。
●サーバー情報の隠匿
ヘッダー情報を確認します。
$ curl -I http://example.com/index.html
HTTP/1.1 200 OK
Server: nginx/1.24.0 (Ubuntu)
Date: Wed, 16 Sep 2026 11:18:07 GMT
Content-Type: text/html
Content-Length: 33
Last-Modified: Wed, 16 Sep 2026 11:06:18 GMT
Connection: keep-alive
ETag: "6aaa782a-21"
Accept-Ranges: bytes
稼働中のWEBサーバが特定されてしまいます。
headers-more-nginx-module を導入すると、ヘッダー情報を自由に書き換えられます。
$ sudo apt install libnginx-mod-http-headers-more-filter
サーバー情報を消去して新たにApache Webサーバに偽装してみます。
$ sudo vi /etc/nginx/nginx.conf

http {
	..............................
	# サーバー情報の隠匿設定
	more_clear_headers 'Server';
	more_clear_headers 'X-Powered-By';
	more_set_headers 'Server: Apache/2.4.1';

	server {
		listen 80;
		server_name 192.168.11.28;
		root /example/www;

		location / {
			index index.html;
		}
	}
}
設定に問題がないか確認し、Nginxを再起動して反映させます。
$ sudo nginx -t
$ sudo systemctl restart nginx
設定が反映されたか確認します。TELNET端末から
$ curl -I http://example.com
HTTP/1.1 200 OK
Date: Thu, 16 Sep 2026 11:20:26 GMT
Content-Type: text/html
Content-Length: 33
Last-Modified: Wed, 16 Sep 2026 11:06:18 GMT
Connection: keep-alive
ETag: "6aaa782a-21"
Server: Apache/2.4.1
Accept-Ranges: bytes
●アクセスログ
Nginxのアクセスログは、パッケージインストール時(Debian/UbuntuやRHEL/AlmaLinuxなど)にOS標準のログ管理ツールである
logrotate を使用してデフォルトでローテートされる設定になっています。
/etc/logrotate.d/nginx に定義されている設定内容は以下の通りです。
/var/log/nginx/*.log {
        daily
        missingok
        rotate 14
        compress
        delaycompress
        notifempty
        create 0640 www-data adm
        sharedscripts
        prerotate
                if [ -d /etc/logrotate.d/httpd-prerotate ]; then \
                        run-parts /etc/logrotate.d/httpd-prerotate; \
                fi \
        endscript
        postrotate
                invoke-rc.d nginx rotate >/dev/null 2>&1
        endscript
}
nginxインストール時の設定ですでにrotateログ設定がされています。
$ ls /var/log/nginx
access.log       access.log.3.gz  error.log       error.log.3.gz
access.log.1     access.log.4.gz  error.log.1     error.log.4.gz
access.log.2.gz  access.log.5.gz  error.log.2.gz  error.log.5.gz
$ cat /var/log/nginx/access.log
192.168.11.77 - - [12/Jul/2026:19:23:09 +0900] "GET /sara/index.php HTTP/1.1" 200 218 "-" "Mozilla/5.0 (Windows NT 10.0; Win64; x64) AppleWebKit/537.36 (KHTML,like Gecko) Chrome/150.0.0.0 Safari/537.36"
192.168.11.77 - - [12/Jul/2026:19:33:43 +0900] "GET /index.php HTTP/1.1" 200 24488 "-" "Mozilla/5.0 (Windows NT 10.0; Win64; x64) AppleWebKit/537.36 (KHTML, like Gecko) Chrome/150.0.0.0 Safari/537.36"
.........................
Apacheのアクセスログに合わせたい場合は書式を設定し、access_logディレクティブで指定します。
$ sudo vi /etc/nginx/nginx.conf
log_format main	'$remote_addr - $remote_user [$time_local] "$request" '
                '$status $body_bytes_sent "$http_referer" '
                '"$http_user_agent" "$http_x_forwarded_for"';
access_log /var/log/nginx/access.log main;
●警告対策
$ sudo systemctl restart nginx
Warning: The unit file, source configuration file or drop-ins of nginx.service changed on disk. Run 'systemctl daemon-reload' to reload units.
この警告は、Nginxのサービス設定ファイル(unit file)がディスク上で変更されたため、OSの管理システム(systemd)にその変更を再読み込みさせる必要があることを伝えています。
設定ファイルを再読み込みします
$ sudo systemctl daemon-reload
Nginxを再起動します
$ sudo systemctl restart nginx
状態を確認します
$ sudo systemctl status nginx
/var/log/nginx/error.log
connect() to [::1]:3000 failed (101: Network is unreachable)
[::1]:3000 への接続に失敗し「Network is unreachable(到達不能)」となる原因は、ホストまたはコンテナ側でIPv6が有効になっていないか、
IPv6ループバック([::1])のルーティングが欠落している環境でIPv4アドレス(127.0.0.1)の代わりにIPv6を指定していることです。
対策: 接続先を [::1] からIPv4の 127.0.0.1 に変更します。
localhostを明示的に 127.0.0.1 へ書き換えます。
|



 Raspberry Piはイギリスのラズベリーパイ財団により開発されたシングルボードコンピュータです。