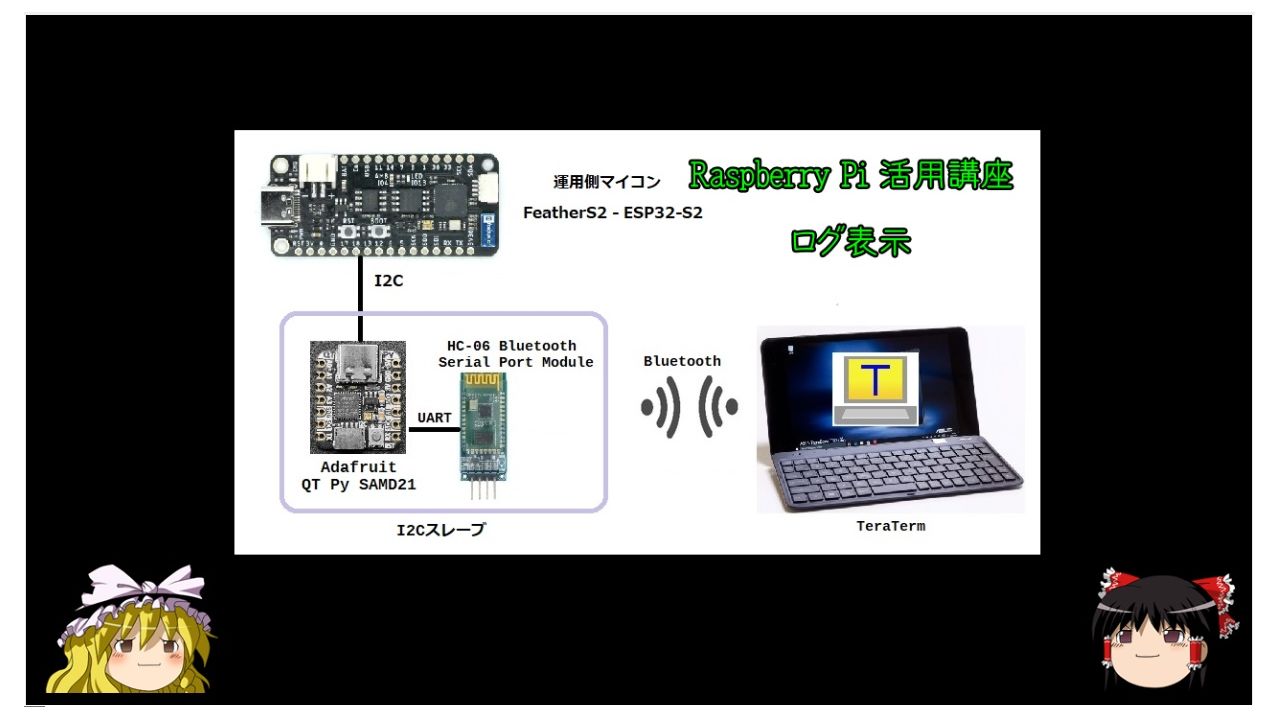
ログ表示
2023.07.16
YouTube でも紹介しています。画像をクリックすると再生できます。
うぷ主の開発環境は、CLIが中心で、Visual Studio Code や eclipse は使用しません。
したがって、チェックポイント的なことや結果表示は、print()系関数を用いることになりますが、シリアル出力を用いたくないことも多々あります。
シリアル入出力は、HardwareSerial, SoftwareSerial, USBCDC などマイコンに依存し、シリアル名もSerial, Serial1, Serial2 など様々です。
このシリアル通信を利用してしまうと、ソースコードの移植性が低下してしまいます。
そこで、今回はI2Cを利用した出力表示を行ってみます。
●概要図
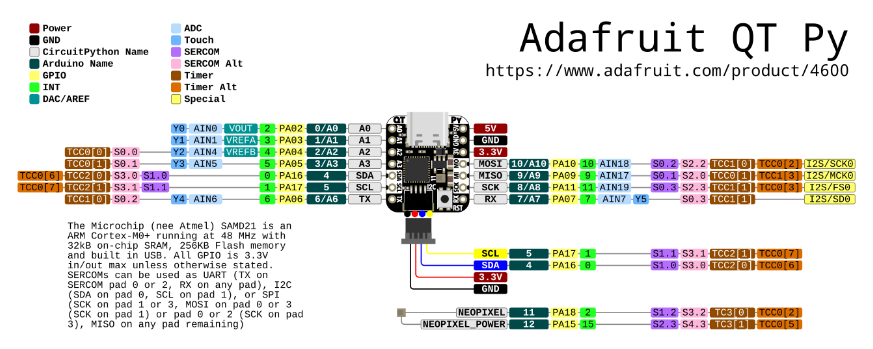
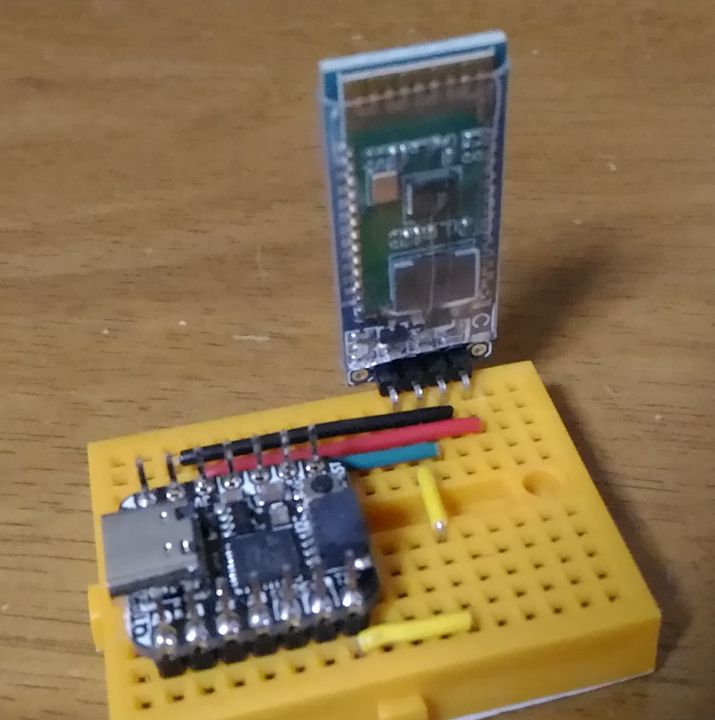
●Adafruit QT Py - SAMD21 Dev Board with STEMMA QT
I2Cスレーブ用マイコンには、SparkFun Qwiic 互換の STEMMA QT コネクタを実装している QT Py SAMD21 を使いました。
 ATSAMD21E18 32-bit Cortex M0+ - 48 MHz 32 bit processor with 256KB Flash and 32 KB RAM
SparkFun Qwiic-compatible STEMMA QT connectors for the I2C bus
●Pinout
Power Pins
3V - this is the regulated output from the onboard regulator. You can draw 500mA
5V - This is 5v out from the USB port. You can also use this as a voltage input but you must have some sort of diode (schottky, signal, power, really anything) between your external power source and this pin with anode to battery, cathode to 5V pin. Note that you cannot power the USB port by supplying 5V to this pin: there is a protection diode that prevents the 5V from reaching the USB connector. This is to protect host computer USB ports, etc. You can draw 1A peak through the diode, but we recommend keeping it lower than that, about 500mA
GND - Power/data/signal ground
Input/Output Pins
General Purpose / Analog Inputs
A0 / D0 - Digital/analog GPIO pin 0. Can act as a true analog output with 10 bit precision, but does not have PWM. Can also be a capacitive touch input.
A1 / D1 - Digital/analog GPIO pin 1. Can be a capacitive touch input or an AREF pin.
A2 / D2 - Digital/analog GPIO pin 2. Can act as PWM or capacitive touch input.
A3 / D3 - Digital/analog GPIO pin 3. Can act as PWM or capacitive touch input.
I2C Pins
SDA / D4 - This is the I2C data pin and digital pin 4, can also be a PWM. There is no analog on this pin! There's no pull up on this pin by default so when using with I2C, you may need a 2.2K-10K pullup on each to 3.3V. All our STEMMA QT breakouts have the pullup installed on the breakout PCB.
SCL / D5 - This is the I2C clock pin and digital pin 5, can also be a PWM. There is no analog on this pin! There's no pull up on this pin by default so when using with I2C, you may need a 2.2K-10K pullup on each to 3.3V
STEMMA QT - This connector allows you to connect over I2C (without soldering!) to breakout boards with STEMMA QT connectors or to other things with various associated accessories. In CircuitPython, you can use the STEMMA connector with board.SCL and board.SDA, or board.STEMMA_I2C().
Hardware Serial Pins
TX / A6 / D6 - Transmit (output) for Serial1. Also analog/digital GPIO 6. Can act as PWM or capacitive touch input.
RX / A7 / D7 - Receive (input) for Serial1. Also analog/digital GPIO 7. Can act as PWM or capacitive touch input.
SPI Pins
SCK / A8 / D8 - Hardware SPI clock pin. Also analog/digital GPIO 8. Can act as PWM output.
MI / A9 / D9 - Hardware SPI MISO microcontroller in serial out pin. Also analog/digital GPIO 9. Can act as PWM output.
MO / A10 / D10 - Hardware SPI MOSI microcontroller out serial in pin. Also analog/digital GPIO 10. Can act as PWM output.
Onboard Neopixel pins
There is a very tiny NeoPixel that is connected to digital pin 11 for signal. If you would like to turn off the pixel for low power usage, set pin 12 low. By default pin 12 is set high for you by Arduino/CircuitPython
Capacitive touch pins
A0, A1, A2, A3, A6 (TX), A7 (RX) can be capacitive touch pins without the need for a separate driver pin.
Analog output pin
Only A0 can be a true analog output (not PWM!) at 10-bit resolution
Analog input pins
All pins except for SDA/SCL can be analog inputs with 12-bit read resolution
PWM output pins
Only A0 and A1 cannot be PWM output
I2S pins
Data pin is RX
Bit Clock pin is MOSI
Word Select pin is SCK
Only one data pin is available so you cannot have both I2S input and output.
●HC-06 Bluetooth Serial Port Module
ItsyBitsy 32u4 をこのモジュールにシリアル接続して、パソコンとBluetooth通信を行います。
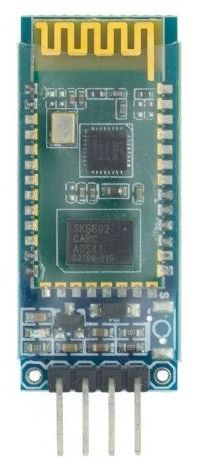 Bluetooth 2.0 serial port module.
| MODEL | HC-06 |
| Work band | 2.4G |
| Communication interface | UART3.3V TTL |
| Working voltage | 3.6~6V |
| Air Speed | 2Mbps |
| Communication level | 3.3V |
| Communication current | 40mA |
| Receiving sensitivity | -85dBm @ 2Mbps |
| Reference distance | 10m |
HC-06の設定および接続方法は下記をご覧ください。
 文字化けしないキーボード
| SAMD21 | - | HC-06 |
|---|
| RX | - | TXD |
| TX | - | RXD |
| GND | - | GND |
| 3V | - | VCC |
ソースコードのビルドには、PlatformIOを使用しています。
Arduino開発環境構築 PlatformIO
$ mkdir -p ~/QTPySAMD21/HC_06
$ cd ~/QTPySAMD21/HC_06
$ pio init -b adafruit_qt_py_m0
$ vi src/i2c_slave.ino
#include <Wire.h>

#define SLAVE_ADDR 0x77
#define BAUDRATE   38400

uint8_t busyFlag = 0 ;  // 0-Ready : 1-Busy
char    buf[64];

void i2c_receive(int numBytes)
{
	char *pt = buf;
	while (Wire.available()){
		*pt = Wire.read();
		pt++;
	}
	busyFlag = 1;
	*pt = 0x00;
	Serial1.print(buf);
	busyFlag = 0;

}

void i2c_send()
{
	Wire.write(busyFlag);
}

void setup()
{
	Serial1.begin(BAUDRATE);
	Wire.begin(SLAVE_ADDR);

	Wire.onReceive(i2c_receive);
	Wire.onRequest(i2c_send);

	Serial1.write("I2C SLAVE STARTED\n");
}

void loop() {}
$ pio run -t upload
I2Cの7bit形式で設定可能なアドレスは8〜119(0x08〜0x77)の111種類です。
I2C予約アドレス
| 0x00 | 全体への指示出しのため |
| 0x01 | CBUS対応のため |
| 0x02 | 異なるBUS対応のため |
| 0x03 | 将来利用予定 |
| 0x04, 0x05, 0x06, 0x07 | 高速モードで利用 |
| 0x78, 0x79, 0x7A, 0x7B | 10bitアドレスモードで利用 |
| 0x7C, 0x7D, 0x7E, 0x7F | 将来利用予定 |
試行錯誤な日々
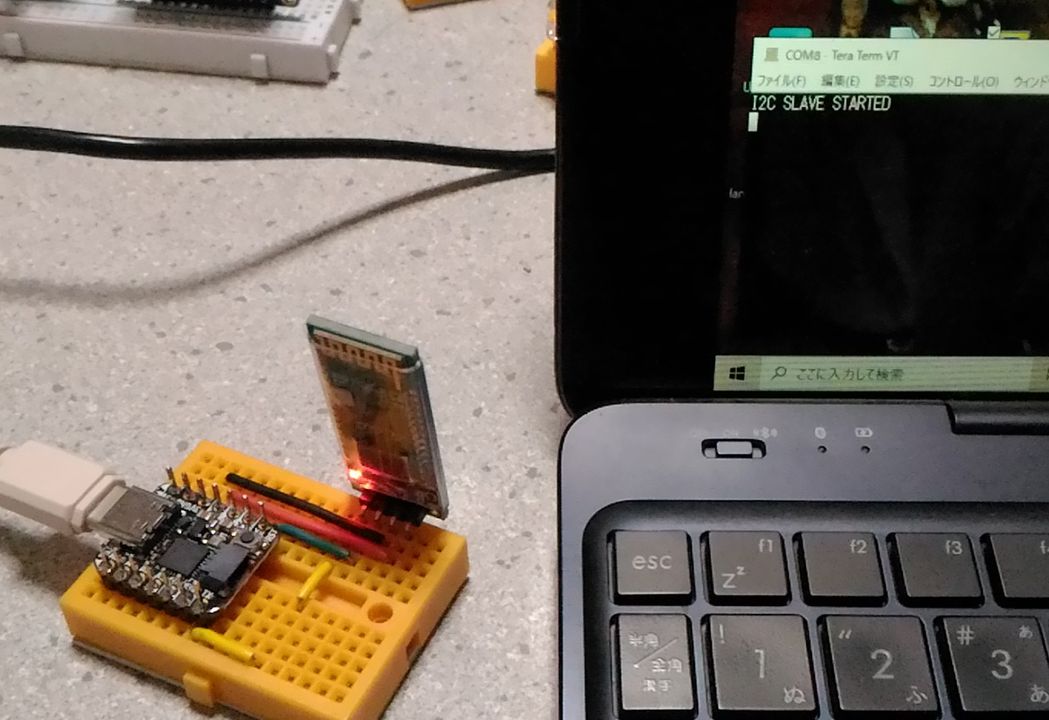
パソコンのTeraTermと接続して、QT Py SAMD21のリセットボタンを押すと、端末上にスレーブ起動のメッセージが表示されます。
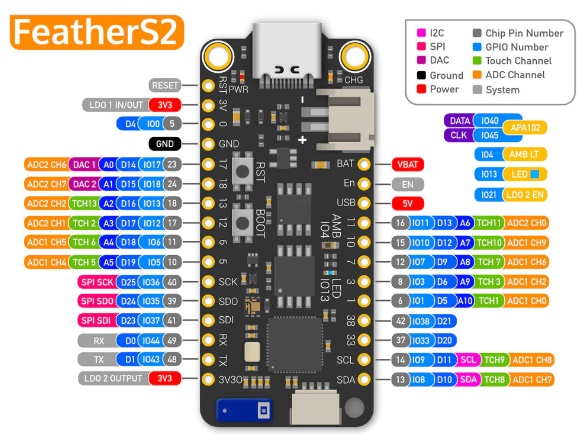
●FeatherS2 - ESP32-S2 by Unexpected Maker
運用側(I2Cマスタ)にも、QWIICコネクタのあるFeatherS2を使用しました。
・32-bit 240 MHz single-core processor
・16 MB SPI Flash
・8 MB extra PSRAM
・2.4 GHz Wi-Fi - 802.11b/g/n
$ mkdir -p ~/FeatherS2/I2C
$ cd ~/FeatherS2/I2Ct
$ pio init -b um_feathers2
$ vi src/debug_print.ino
#include <Wire.h>

#define SLAVE_ADDR 0x77

void debug_print(const char* format, ...)
{
	va_list args;
	char buf[256];
	va_start(args, format);
	vsprintf(buf,format,args);
	va_end(args);

	Wire.beginTransmission(SLAVE_ADDR);
	Wire.write(buf);
	Wire.endTransmission();
}

void setup()
{
	Wire.begin();

	debug_print("Date : %04d/%02d/%02d %02d:%02d:%02d\n",2023,7,4,14,9,20);
}

void loop() {}
$ pio run -t upload
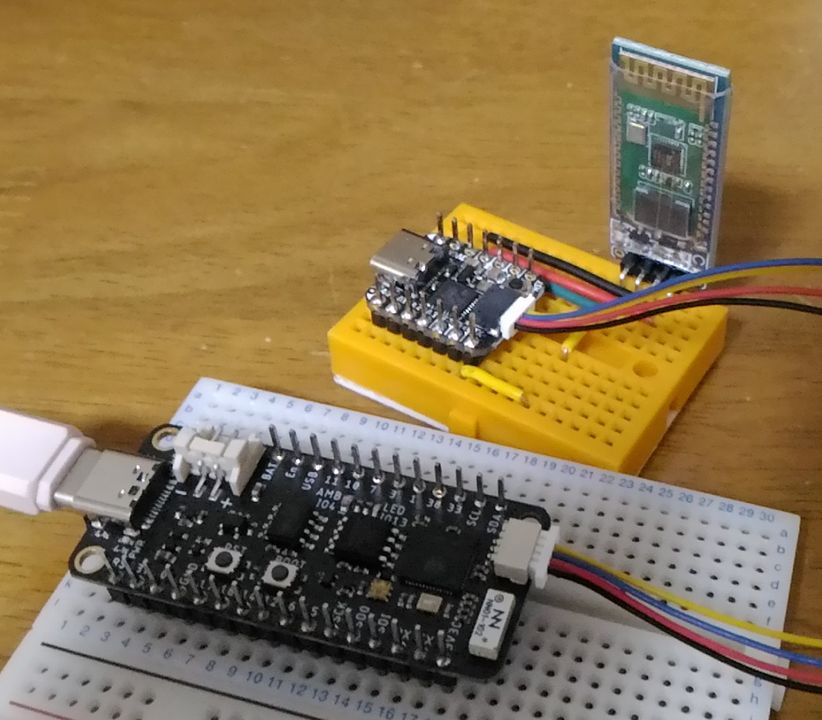
I2Cスレーブ側の QT Py SAMD21 と 運用側 FeatherS2 を QWiicケーブルで接続すると、運用側からの電源供給により、QT Py SAMD21 が稼働します。
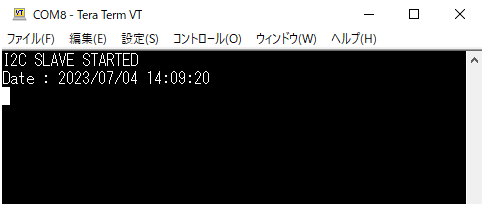
運用側マイコンをリセットすると、debug_print()関数の編集文字列がI2Cスレーブ経由、Bluetooth接続により端末に表示されます。
●補足
debug_print()内の書式指定は、C言語のprintf()と同様です。
ESP32系は問題ないのですが、Arduino の場合は浮動小数を扱えません。
■参考文献
・Arduino同士をI2C接続 ~I2C SLAVE~
・Arduino IDE(Wire: onReceive関数の使い方
・Arduinoを使いBluetooth通信をやってみる!HC-05/HC-06 Bluetoothモジュールの使い方!
|
 Raspberry Pi(ラズベリー パイ)は、ARMプロセッサを搭載したシングルボードコンピュータ。イギリスのラズベリーパイ財団によって開発されている。
 KEYESTUDIO Micro:bit V2ロボットスターターキット (マイクロビットなし) MakecodeとPython用
動き、光と音の使い方、障害物の検知と回避方法、線をたどり、IRリモコンとアプリでコントロールする方法を学びます。
 Maqueen Lite V5 micro:bit ロボットキット STEM用(ライントレース&障害物回避)
Maqueen Lite V5 STEMロボットは、事前調整済みのライントレースアルゴリズム、耐衝撃モーター、開封即使用可能な設計で、ストレスを解消します。
 たいていのことは100日あれば、うまくいく。長田英知著
「時間がなくて、なかなか自分のやりたいことができない」
「一念発起して何かを始めても、いつも三日坊主で終わってしまう」
「色んなことを先延ばしにしたまま、時間だけが過ぎていく」
そこで本書では、そんな著者が独自に開発した、
まったく新しい目標達成メソッド「100日デザイン」について、
その知識と技術を、余すところなくご紹介します。
 まんがで納得ナポレオン・ヒル 思考は現実化する
OLとして雑務をこなす日々に飽き足らず、科学者だった父が残した薬品を商品化すべく、起業を決意した内山麻由(27)。彼女はセミナーで知り合った謎の女性からサポートを得ながら、彼女と二人三脚でナポレオン・ヒルの成功哲学を実践し、さまざまな問題を乗り越えていく。
ヒル博士の<ゴールデンルール>に従い、仕事に、恋に全力疾走する彼女の、成功への物語。
 今日は人生最悪で最高の日 1秒で世界を変えるたったひとつの方法 ひすいこたろう著
偉人の伝記を読むと、最悪な日は、不幸な日ではなく、新しい自分が始まる日であることがわかります。最悪な出来事は、自分の人生が、想像を超えて面白くなる兆しなのです。偉人伝を読むことで、このときの不幸があったおかげで、未来にこういう幸せがくるのかと、人生を俯瞰する視線が立ち上がるのです。
 ご飯は私を裏切らない heisoku著
辛い現実から目を背けて食べるご飯は、いつも美味しく幸せを届けてくれる。
29歳、中卒、恋人いない歴イコール年齢。バイト以外の職歴もなく、短期バイトを転々とする日々。ぐるぐると思索に耽るけど、ご飯を食べると幸せになれる。奇才の新鋭・heisokuが贈るリアル労働グルメ物語!
 【最新版Gemini 3に対応!】できるGemini (できるシリーズ)
Geminiを「最強の知的生産パートナー」として使いこなすための、実践的なノウハウを凝縮した一冊です。
基本的な操作方法から、具体的なビジネスシーンでの活用、日々の業務を自動化するGoogle Workspaceとの連携、さらには自分だけのオリジナルAIを作成する方法まで余すところなく解説します。
 Rustプログラミング完全ガイド 他言語との比較で違いが分かる!
Rustの各手法や考え方を幅広く解説!
500以上のサンプルを掲載。実行結果も確認。
全24章の包括的なチュートリアル。
 ポチらせる文章術
販売サイト・ネット広告・メルマガ・ブログ・ホームページ・SNS…
全WEB媒体で効果バツグン!
カリスマコピーライターが教える「見てもらう」「買ってもらう」「共感してもらう」すべてに効くネット文章術
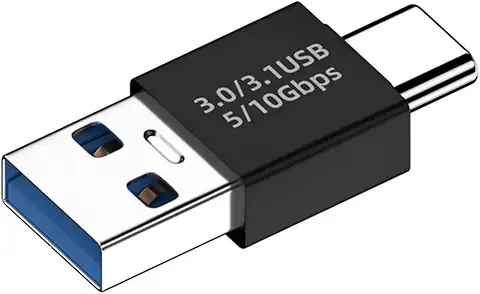 小型で便利な Type-C アダプター USB C オス - USB3.1 オスアダプター
Type-C端子のマイコンボードをこのアダプタを介して直接Raspberry Piに挿すことができます。ケーブルなしで便利なツールです。
 Divoom Ditoo Pro ワイヤレススピーカー
15W高音質重低音/青軸キーボード/Bluetooth5.3/ピクセルアート 専用アプリ/USB接続/microSDカード
 電源供給USBケーブル スリム 【5本セット】
USB電源ケーブル 5V DC電源供給ケーブル スリム 【5本セット】 電源供給 バッテリー 修理 自作 DIY 電子工作 (100cm)
|