KCX Bluetooth Emitter
2025.06.23
YouTube でも紹介しています。画像をクリックすると再生できます。
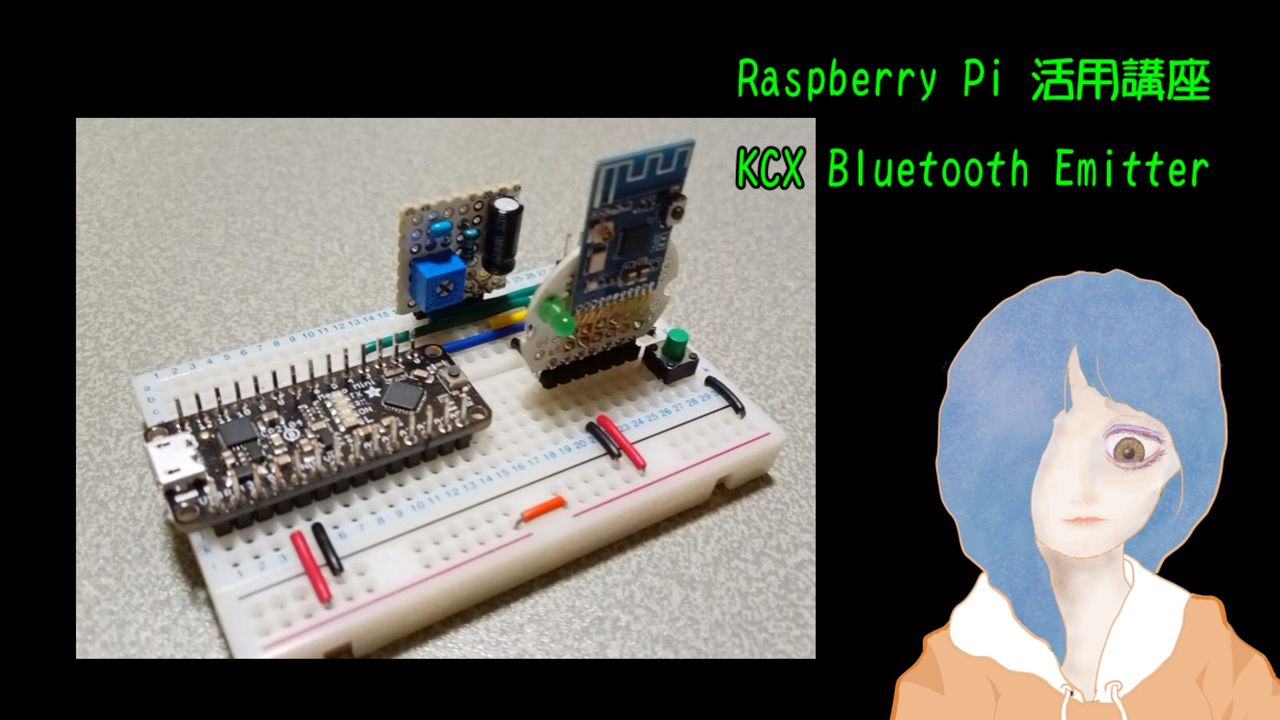
●KCX Bluetooth Emitter
KCX Bluetooth Emitter は、Bluetoothトランスミッターおよびレシーバーとして機能します。
今回は、DFPlayerからのオーディオ出力をKCXを介して、Bluetoothスピーカーで再生させます。
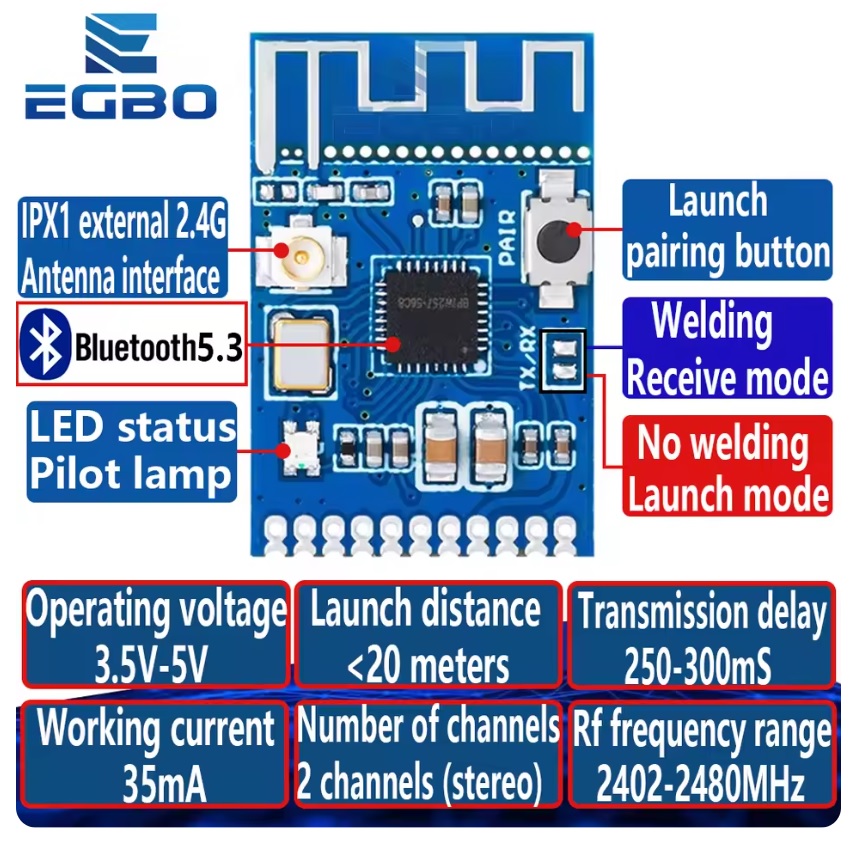
 KCX_BT_EMITTER Low cost bluetooth (BT) audio module
仕様
・製品モデル: kcx _ emiter
・動作電圧: 3.5-5v
・稼働電流: 35ma
・発射距離: 20メートル以下
・RF出力電力: + 5dbm RF周波数範囲: 2402-2480mhz
・オーディオダイナミック範囲: 80db
・オーディオ総調波歪み:-70db
・オーディオ周波数レスポンス: 20hz-20khz
・オーディオの信号対ノイズ比: 95db
・オーディオ入力および出力信号の強度: 2vpp以下チャンネル数: 2チャンネル (ステレオ)
・伝送遅延: 250-300ms
・ピッチ間隔:約1.25mm
・寸法: 23.5x15.5mm
●前準備 DFPlayer Mini
Bluetoothスピ―カ―での再生テスト用音源として利用します。
DFPLAYERに関しては豊富な情報が公開されているので、そちらをご覧ください。
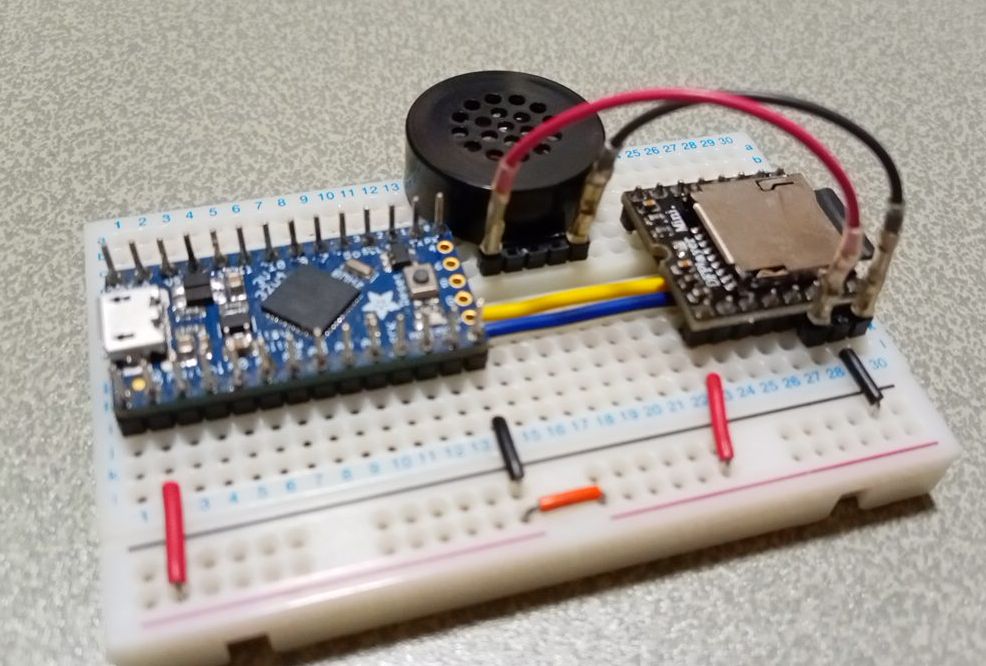
DFPlayerのI/Oは3,3Vなので、マイコンには Adafruit ItsyBitsy 32u4 - 3V 8MHz を使っています。
スピーカーに繋いでいる2本のワイヤーを外して、赤線(+)→AUDIO_R、黒線(-)をAUDIO_Lに繋ぎ変えます。
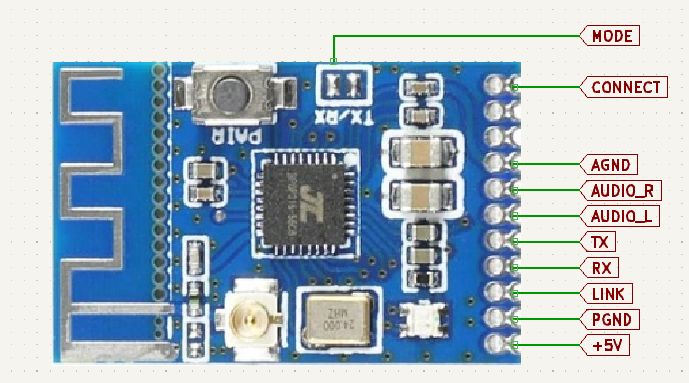
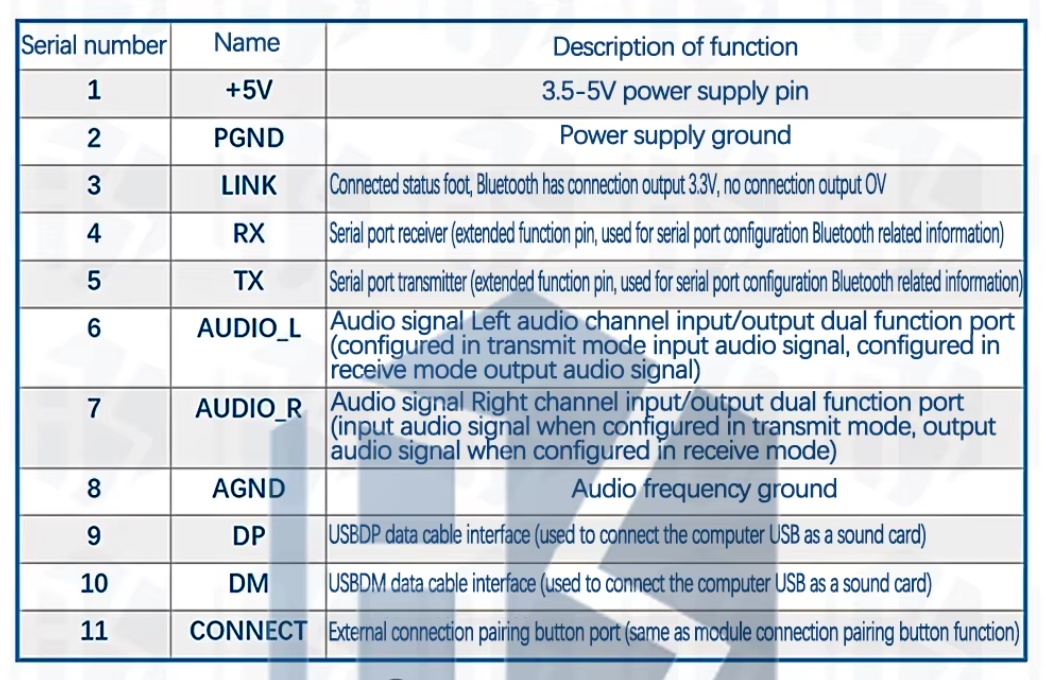
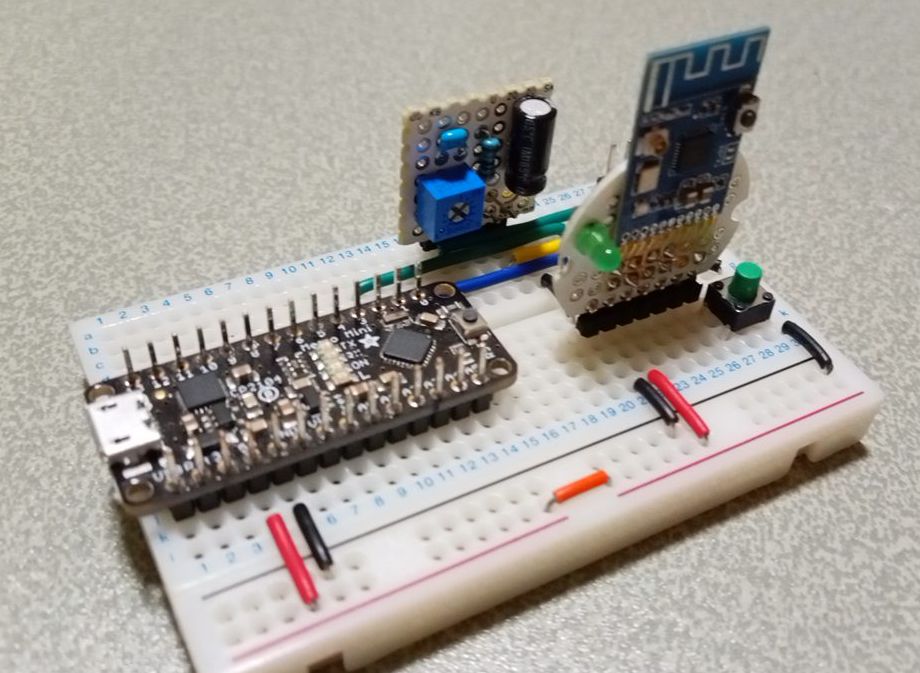
●KCX Bluetooth Emitter ピン配置
USB接続の場合
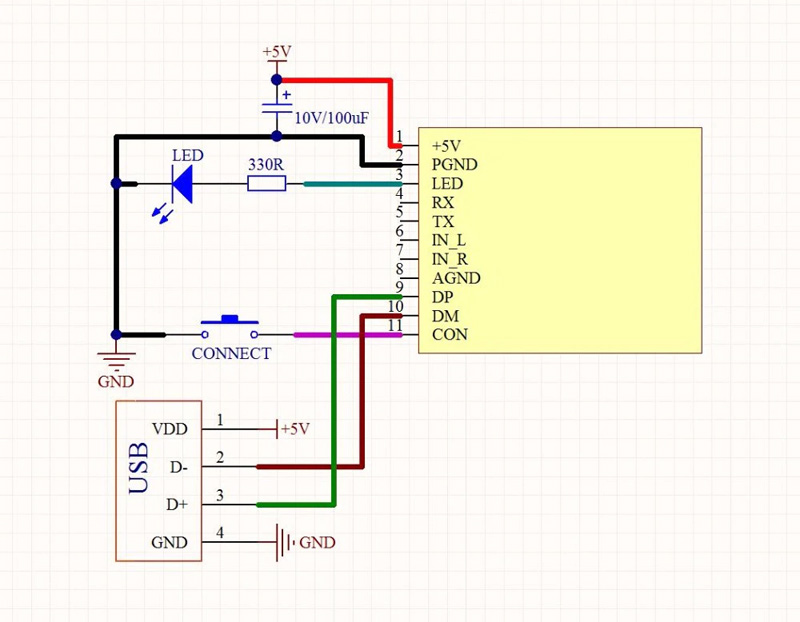
WindowsのUSBポートに接続して使用する際の接続です。
シリアル接続の場合
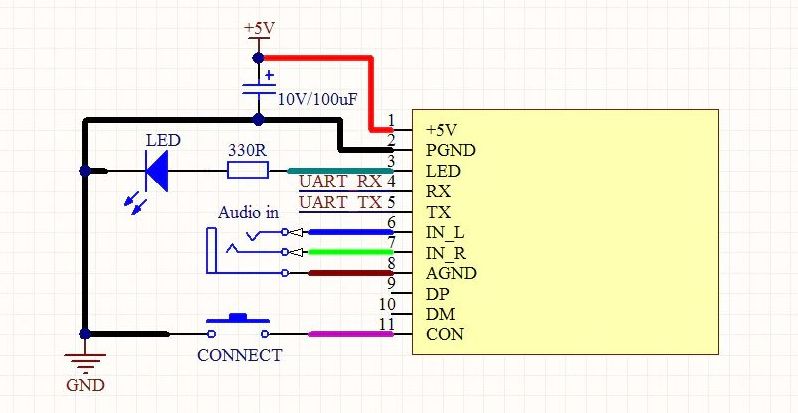
UART端子を利用する際の接続図です。このシリアル端子をマイコンと直接接続して使用します。
・9:DP, 10:DM シリアル接続を利用するので使用しません。
・3:LINK Bluetoothスピーカーに接続された際にHIGHになるので、LEDをつなぎ、2:PGNDに落としています。
・8:AGND Audioグランドも2:PGNDに落とします。
これにより外部接続端子は7つに集約されます。
| ARDUINO | | 変換基板PIN | | KCX BT EMITTER |
|---|
| 5V | ━ | 2 | ━ | 1:+5V |
| GND | ━ | 1 | ━ | 2:PGND |
| | | | | 3:LINK-680Ω-LED→PGND |
| 3:TxD | ━ | 3 | ━ | 4:RX |
| 2:RxD | ━ | 4 | ━ | 5:TX |
| | | 6 | ━ | 6:AUDIO_L |
| 8-分圧抵抗 | ━ | 5 | ━ | 7:AUDIO_R |
| | | | | 8:AGND→PGND |
| GND-スイッチ | ━ | 7 | ━ | 11:CONNECT |
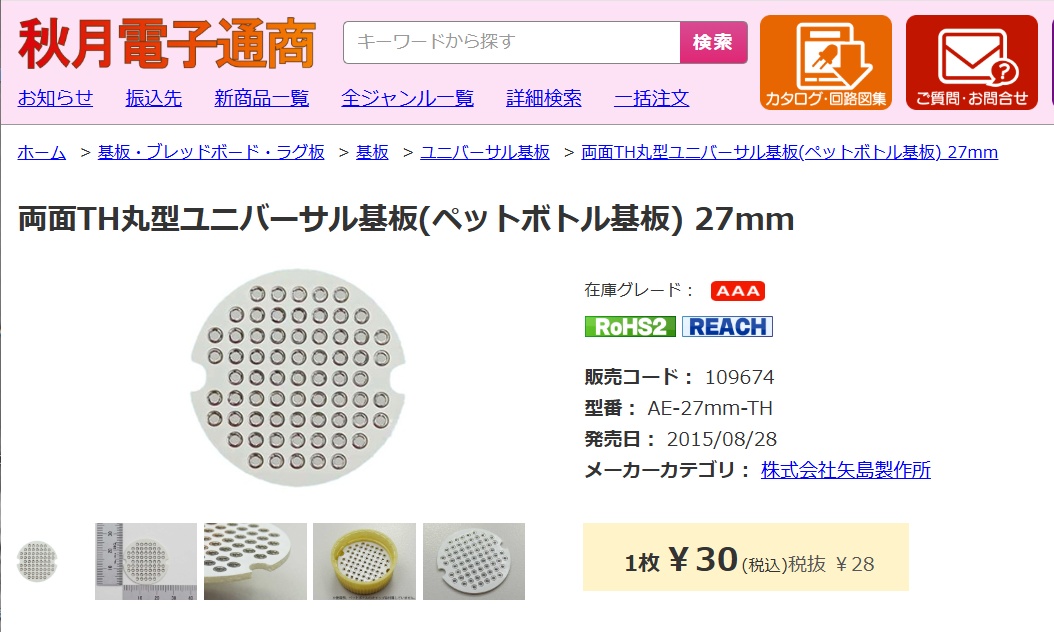
ユニバーサル基板
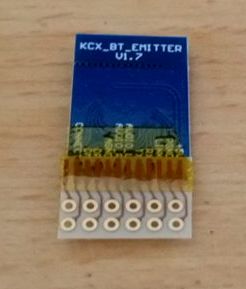
KCXボードは、1.27mmピッチなので、ブレッドボードに挿せるように2.54ピッチに変換します。
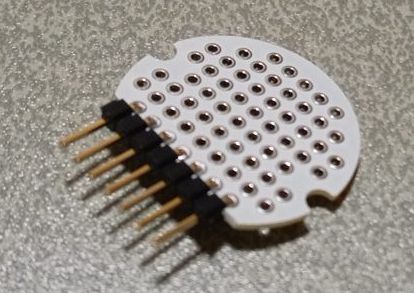
最下行5穴をカットして7穴にL型ピンヘッダーをはんだ付けします
KCXモジュールのDIP変換

 裏面をみると、スルーホール以外の部分は絶縁されていて、ユニバーサル基板に重ねてもショートすることはありません
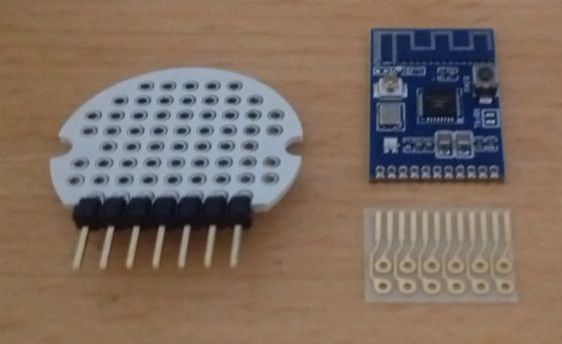 12ピン分をハサミで切り取って、基板にはんだ付けます
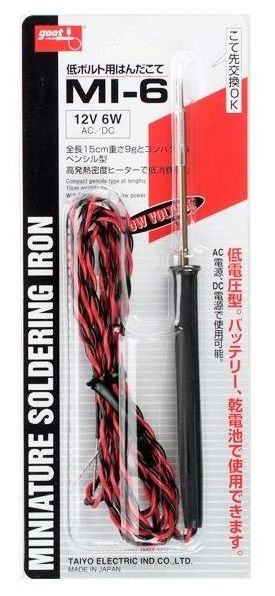
低ボルトはんだごて MI-6-12V【goot】
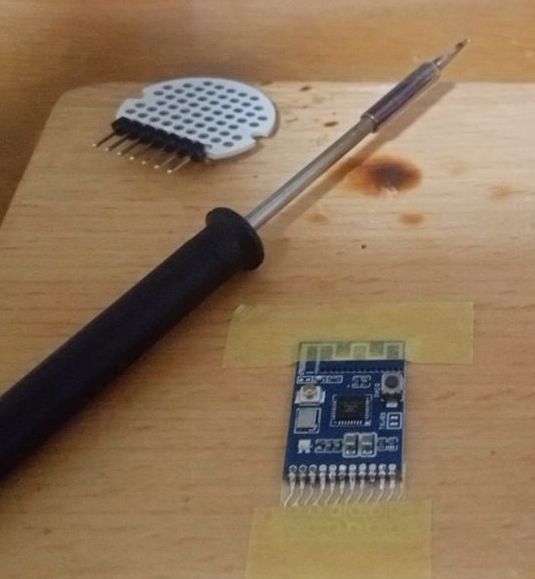
1.27㎜ピッチの基板には、MINIATURE SOLDERING IRONを使うと容易にはんだ付けを行うことができます
 念のため、剥離防止に基板が重なっている部分にポリイミドテープを貼っています。
また、その上の部分に両面テープで円形基板に貼り付けます。
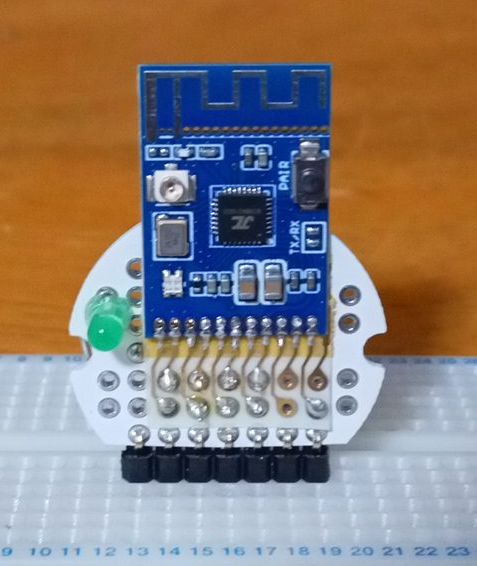
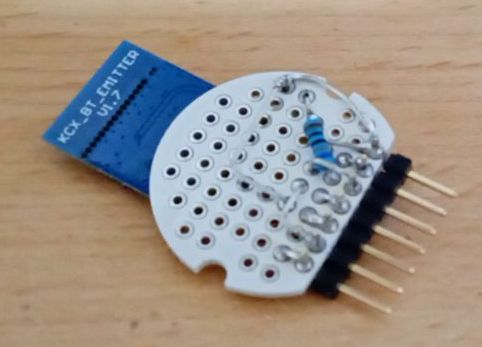
KCXボード3番LINK端子に680Ω抵抗を経由してLEDをはんだ付けし、2番PGNDに落としています
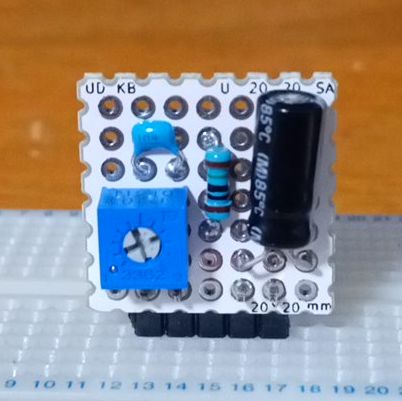
●分圧により音量をさげるモジュール
KCX Bluetooth Emitter をレシーバーとして使用する際は、音量を設定することができるようですが、
トランスミッターとして使う場合の音量設定はないようです。
DFPlayer Miniには音量調節機能がありますが、かなり音量を絞ってもKCX経由でBluetoothスピーカーで再生してみるとかなり大きな音になってしまうことがあります。
そこで、外部オーディオ機器からの入力を分圧により減圧します。
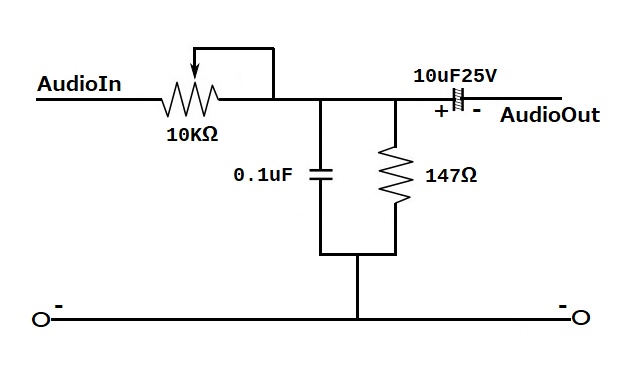
ここで重要なのが、0.1uFのキャパシタです。これを挟むことでバックノイズがかなり消えます。
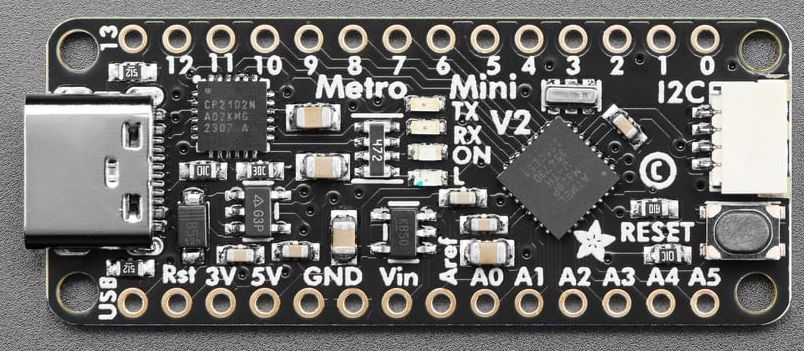
●Adafruit Metro Mini 328 - 5V 16MHz
KCXの動作電圧は 3.5~5v です。マイコンボードには Arduino UNO や NANO が使用できます。
・ATmega328 microcontroller with Optiboot (UNO) Bootloader
・USB Programming and debugging via the well-supported genuine FTDI FT231X
・Input voltage (Vin): 6-16V (a 9VDC power supply is recommended)
・5V logic with 3.3V compatible inputs, can be converted to 3.3V logic operation
・20 Digital I/O Pins: 6 are also PWM outputs and 6 are also Analog Inputs
・32KB Flash Memory - 0.5K for bootloader, 31.5KB available after bootloading
・16MHz Clock Speed
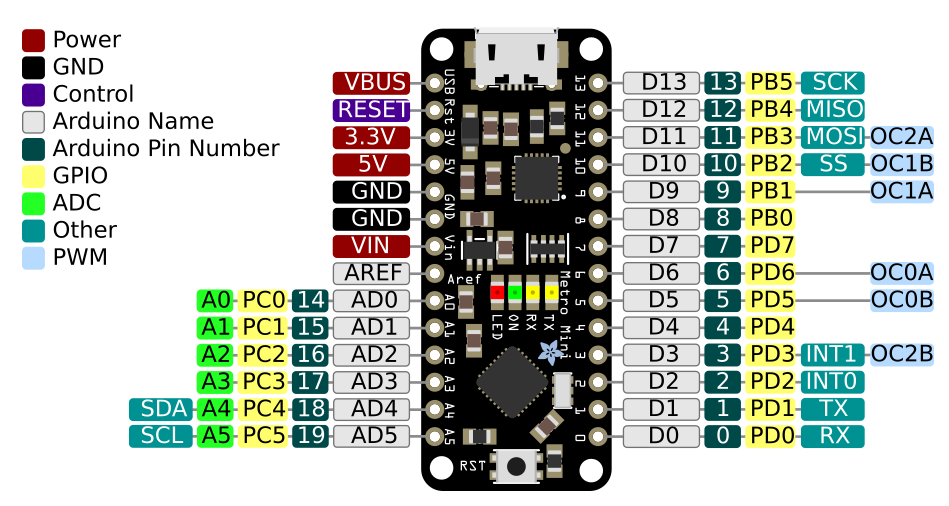
●Pinout
Adafruit Metro Mini
The bottom row has 6 power pins that you will find handy!
・USB is connected directly to the micro USB connector, and is great when you need a lot of 5V power for NeoPixels or servos, etc. If USB is not plugged in, this will not be powered
・3V this is the 3V regulator ouput. On the FTDI-using Metro Mini, this will be 50mA output. On the CP2104-using Metro Mini it will be 500mA max output. Note you can only get 500mA out when its plugged into USB
・5V is the 5V output. If powered from USB, it is powered from USB power through a Schottkey diode. If you are only powering from Vin, it will give you up to 150mA of current out
・Vin is the battery input. You can provide 5V to 16V input. Note that we linearly regulate this down, so using a higher voltage will cause your board to heat up more. 5-8V is a good place to stay.
You can connect both USB and Vin power, and the metro will automatically switch between the two to maintain the highest voltage output on 5V out.
●Voltage Select Jumper

On the bottom of the board, there is a Vio jumper, which you can see ties the middle pad to 5V. If you want to use your Metro Mini in 3V logic mode - which can really simplify connecting to many chips, sensors, and displays - cut the little trace to the left, and solder the middle pad and right pad together. Use a multimeter to check that you really cut that trace, as shorting 3V and 5V together is very bad and may damage your Mini!
ボード上には赤色 LED があります、
Bluetoothスピーカーに接続されていないときは高速点滅、接続されると低速点滅(実際には2回の点滅と長めの休止)するとともに、7番端子に接続されているLEDが点灯します。
接続後にデバイスの電源をオフにして接続が切断されると、LEDはスキャン状態に戻り、高速点滅します。
DFPlayer からの入力レベルを分圧により減圧しない場合は、
KCXの7番AUDIO_Rピンと2番PGNDの間に100uF/16Vのコンデンサを挟むと、バックグランド・ノイズが劇的に改善されます。
11番CONNECTにタクトスイッチを付けて、GNDに落としています。
スイッチが押されると自動接続リストが削除され、デバイスのスキャンが開始されます。
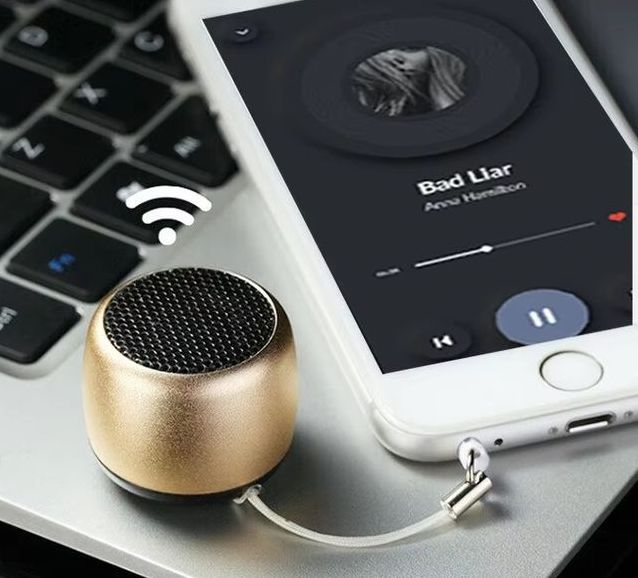
●Bluetoothスピーカー
| Bluetooth Version: | Bluetooth V5.0 |
| Speaker Parameter: | 4Ω2W diameter 28mm |
| Transmitting Frequency: | 20Hz - 20KHz |
| Battery: | 3.7V/200mAh |
| S/N: | => 90DB |
| THD: | <1% |
| Charging Time: | 2-3 Hours |
| Play Time: | 1 Hour |
| Product Size: | φ34x28.5mm |
| Product Weight: | 33g |
MACアドレスの確認
 KCXモジュールでは、認識できたBluetoothデバイスのMACアドレスを取得することができますが、
事前にスマホを用いて使用するBluetoothスピーカーのMACアドレスを確認しておきます。
KCXモジュールでは、認識できたBluetoothデバイスのMACアドレスを取得することができますが、
事前にスマホを用いて使用するBluetoothスピーカーのMACアドレスを確認しておきます。
●サンプルプログラム
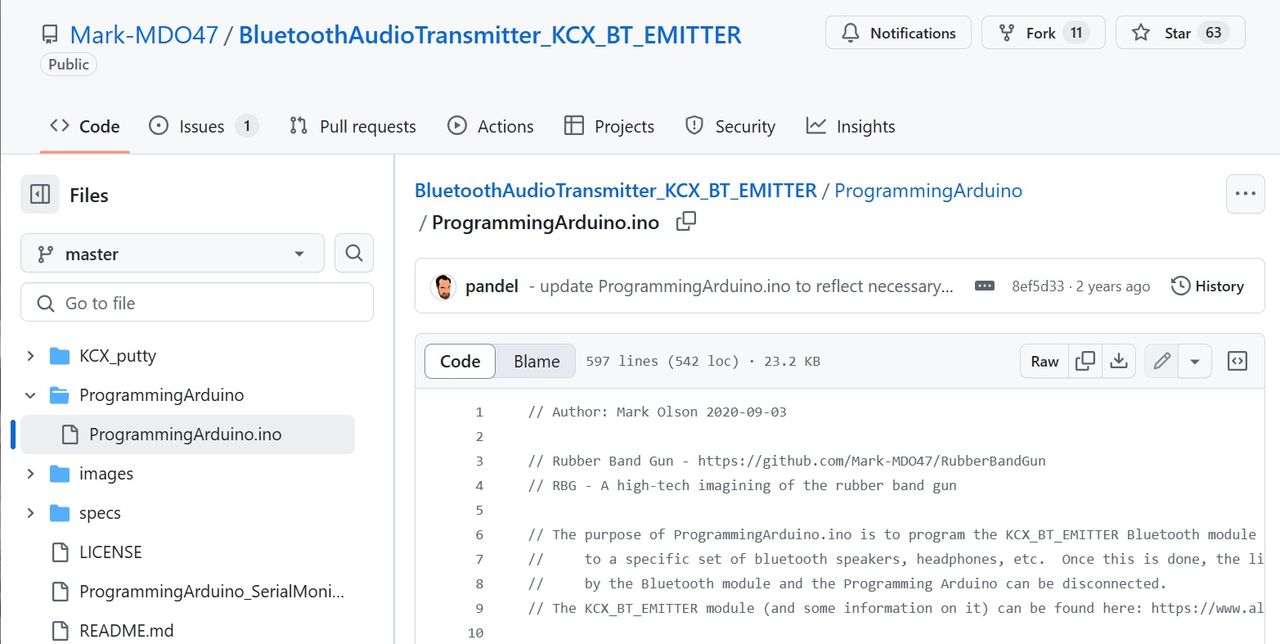
ProgrammingArduino.ino
●開発環境
ソースコードのビルドには、PlatformIOを使用しています。
Arduino開発環境構築 PlatformIO
●ProgrammingArduino.ino の編集
ソフトウェア・シリアルのポート番号を環境に合わせて変更します
#define DPIN_BLUESRL_RX 2
#define DPIN_BLUESRL_TX 3
SoftwareSerial myBlueSerial(DPIN_BLUESRL_RX, DPIN_BLUESRL_TX);
その他、多くの箇所を変更しています。
void processCommand() {
	........
	switch (inBytes[0]) {
	........
		case '8':  // 7 - PowerOff module");
			Serial.println("\n8=Auto Connect Setting");
			sendBlueCmd("AT+");
			sendBlueCmd("AT+DISCON");
			sendBlueCmd("AT+DELVMLINK");
			sendBlueCmd("AT+ADDLINKADD=0f1939d72316");
			sendBlueCmd("AT+ADDLINKNAME=HW-BT");
			sendBlueCmd("AT+ADDLINKADD=014d0b2d4241");
			sendBlueCmd("AT+ADDLINKNAME=MT");
			loopReportBlueCom();
			break;
	........
自動接続リストは所有するBluetoothスピーカーに合わせて変更してください、
ProgrammingArduino.ino (改造版)
//////////////////////////////////////////////////////////////////////////////////////
// KCX_BT_EMITTER v1.7
// Author: Mark Olson 2020-09-03
// Rubber Band Gun - https://github.com/Mark-MDO47/RubberBandGun
// When running the sketch, you can select steps in any order as follows:
//     https://item.taobao.com/item.htm?spm=a21wu.12321156-tw.0.0.7e76d1c7xEOcFZ&id=570274835710
//     https://www.electro-tech-online.com/threads/kcx_bt_emitter-low-cost-bluetooth-bt-audio-module.158156/

#include "Arduino.h"
#include "SoftwareSerial.h"  // to talk to KCX_BT_EMITTER without using up debug serial port

#define DPIN_BLUESRL_RX 2  // serial in  - talk to Bluetooth module (KCX_BT_EMITTER) - connect to YELLOW wire
#define DPIN_BLUESRL_TX 3  // serial out  - talk to Bluetooth module (KCX_BT_EMITTER) - connect to GREEN wire

SoftwareSerial BTSerial(DPIN_BLUESRL_RX, DPIN_BLUESRL_TX);  // to talk to Bluetooth
SoftwareSerial DFSerial(10, 11);  // RX, TX

#define NUMWAIT 500  // loopcount waiting for response from Bluetooth module

#define NUMOF(a) (sizeof((a)) / sizeof(*(a)))

uint8_t DEBUG_SERIAL_IN = 0;  // 1 to debug the serial input code

char inBytes[100];

char cmd_bld_ADDLINKADD[32];   // must build these in RAM from user input
char cmd_bld_ADDLINKNAME[64];  // must build these in RAM from user input

void setup() {

	Serial.begin(115200);  // this is for general debug
	while (!Serial); // wait for serial port to connect. Needed for native USB port only
	BTSerial.begin(115200);  // this is control for Bluetooth module (KCX_BT_EMITTER)
}

void loop() {
	static uint8_t menuPrinted = 0;

	if (0 == menuPrinted) {
		menuPrinted = 1;
		Serial.println("");
		Serial.println("   1 - Scan for Bluetooth receiver devices (such as speaker, headphones, etc.)");
		Serial.println("   2 - Display stored auto-connect Bluetooth receiver devices");
		Serial.println("   3 - Add one auto-connect Bluetooth receiver device to storage");
		Serial.println("   4 - Delete all auto-connect Bluetooth receiver devices from storage");
		Serial.println("   5 - Current status");
		Serial.println("   6 - BT Disconnect");
		Serial.println("   7 - PowerOff module");
		Serial.println("   8 - Auto Connect Setting");
		Serial.print("==> ");
	}

	if (Serial.available()) {
		menuPrinted = 0;
		processCommand();
	}
}

/////////////////////////////////////////////////////////////////////////////////////////////////////////
// processCommand(uint8_t theChoice)
//    performs one of the four menu options
//    as needed, reports scan info from Bluetooth
//
void processCommand() {
	uint8_t addlinkOk = 0;

	getSerial_chars();
	reportBlueCom();
	switch (inBytes[0]) {
		case '1':  // 1 - Scan for Bluetooth receiver devices (such as speaker, headphones, etc.)");
			Serial.println("\n1=SCAN");
			sendBlueCmd("AT+");
			sendBlueCmd("AT+RESET");
			sendBlueCmd("AT+");

			// Scan for any visible Bluetooth devices
			sendBlueCmd("AT+PAIR");
			delay(100);

			// need to hang around a little more
			loopReportBlueCom();
			break;
		case '2':  // 2 - Display stored auto-connect Bluetooth receiver devices");
			Serial.println("\n2=DISPLAY");
			sendBlueCmd("AT+");
			// sending this command returns all information recorded in the automatically reconnect MAC and device name memory.
			sendBlueCmd("AT+VMLINK?");
			delay(500);
			break;
		case '3':  // 3 - Add one auto-connect Bluetooth receiver device to storage");
			// You can have up to 10 auto-connect Bluetooth receiver devices in storage
			// The Bluetoth module will connect to the first device it finds in order
			// NOTE: must be exactly 12 characters for hex string
			Serial.println("\n3=ADD");
			addlinkOk = buildADDLINKADD(cmd_bld_ADDLINKADD, NUMOF(cmd_bld_ADDLINKADD) - strlen("AT+ADDLINKADD="));
			if (0 != addlinkOk) {
				reportBlueCom();
				addlinkOk = buildADDLINKNAME(cmd_bld_ADDLINKNAME, NUMOF(cmd_bld_ADDLINKNAME) - strlen("AT+ADDLINKNAME=") - 2);
			}
			if (0 != addlinkOk) {
				reportBlueCom();
				sendBlueCmd("AT+");
				sendBlueCmd("AT+DISCON");
				sendBlueCmd("AT+VMLINK?");

				// associate the Bluetooth device name with internal list of MAC addresses for auto-connection
				// Set the memory. When the module is started , it will search the MAC address of the device and the MAC address of the recording area.
				// The address is automatically connected to any one of the MAC addresses of the recording area,
				//  and is not connected when the address is not consistent, so as to achieve the specified MAC address connection.
				sendBlueCmd(cmd_bld_ADDLINKADD);
				sendBlueCmd(cmd_bld_ADDLINKNAME);

//			sendBlueCmd("AT+RESET");
				sendBlueCmd("AT+");
				sendBlueCmd("AT+VMLINK?");
				// need to hang around a little more
				loopReportBlueCom();
			} else {
				reportBlueCom();
				Serial.println("");
				Serial.println("User aborted storing MAC address for the Bluetooth speaker or headphones\n");
			}
      break;
		case '4':  // 4 - Delete all auto-connect Bluetooth receiver devices from storage");
			Serial.println("\n4=DELETE ALL");
			sendBlueCmd("AT+");
			sendBlueCmd("AT+DISCON");
			sendBlueCmd("AT+DELVMLINK");
			sendBlueCmd("AT+RESET");
			sendBlueCmd("AT+");
			sendBlueCmd("AT+VMLINK?");
      loopReportBlueCom();
			break;
		case '5':  // 5 - Show current status");
			Serial.println("\n5=STATUS");
			sendBlueCmd("AT+");
			sendBlueCmd("AT+GMR?");
			sendBlueCmd("AT+BAUD?");
			sendBlueCmd("AT+STATUS?");
			loopReportBlueCom();
			break;
		case '6':  // 6 - Disconnect current BT");
			Serial.println("\n6=Disconnect");
			sendBlueCmd("AT+");
			sendBlueCmd("AT+DISCON");
			loopReportBlueCom();
			break;
		case '7':  // 7 - PowerOff module");
			Serial.println("\n7=PowerOff module");
			sendBlueCmd("AT+");
			sendBlueCmd("AT+POWER_OFF");
			loopReportBlueCom();
			break;
		case '8':  // 7 - PowerOff module");
			Serial.println("\n8=Auto Connect Setting");
			sendBlueCmd("AT+");
			sendBlueCmd("AT+DISCON");
			sendBlueCmd("AT+DELVMLINK");
			sendBlueCmd("AT+ADDLINKADD=0f1939d72316");
			sendBlueCmd("AT+ADDLINKNAME=HW-BT");
			sendBlueCmd("AT+ADDLINKADD=014d0b2d4241");
			sendBlueCmd("AT+ADDLINKNAME=MT");
			loopReportBlueCom();
			break;
		case 'A':  // AT Command
			Serial.print("\n");
			if (strncmp(inBytes,"AT+",3)==0) {
				sendBlueCmd(inBytes);
				loopReportBlueCom();
			}
			break;
  }  // end switch()
  Serial.println("\n--- KCX_BT_EMITTER PROGRAMMING STEP COMPLETE ---");
}  // end processCommand()

/////////////////////////////////////////////////////////////////////////////////////////////////////////
// buildADDLINKADD(char * cmdAddr, uint16_t cmdMaxLen)
//    builds a RAM AT+ADDLINKADD command from user input
//
// NOTE: the hex MAC Address sent in the AT command must be exactly 12 characters
//
uint8_t buildADDLINKADD(char *cmdAddr, uint16_t cmdMaxLen) {
	char myLowerCase[15];  // never want to over-run
	uint8_t myNumChars = 0;
	uint8_t myStart = 0;
	char const *zeroFill = "000000000000";
	Serial.println("");
	Serial.println("Enter the unique MAC address for the Bluetooth speaker or headphones; it starts with 0x");
	Serial.println("    upper or lower case does not matter; maximum of 12 characters after the 0x");
	Serial.println("To abort adding an auto-connect Bluetooth receiver device to storage, just enter an empty line");
	Serial.print("==> ");
	while (!Serial.available());  // wait
	// reportBlueCom();
	myNumChars = getSerial_chars();
	if (0 == myNumChars) return (0);  // abort
	if (('0' == inBytes[0]) && ('x' == tolower(inBytes[1]))) myStart = 2;
	myNumChars -= myStart;
	if (DEBUG_SERIAL_IN) {
		Serial.print("   input string |");
		Serial.print(inBytes);
		Serial.print("| myStart ");
		Serial.print(myStart);
		Serial.print(" myNumChars ");
		Serial.println(myNumChars);
	}  // end if (DEBUG_SERIAL_IN)
	if (myNumChars > 12) {
		Serial.println("Abort - more than 12 characters");
		return (0);  // abort
	}
	for (int j = myStart; (j < (myNumChars + myStart)) && (0 != inBytes[j]); j++) {
		if (0 == isxdigit(inBytes[j])) {
			Serial.print("Abort - non-hex digit: ");
			Serial.print(inBytes[j]);
			Serial.print(" j ");
			Serial.println(j);
			return (0);  // abort
		}
		myLowerCase[j] = tolower(inBytes[j]);
	}
	myLowerCase[myNumChars + myStart] = 0;
	Serial.print("\nYour entry \"");
	Serial.print(inBytes);
	Serial.println("\" was accepted");
//	strcpy(cmdAddr, "AT+ADDLINKADD=0x");
	strcpy(cmdAddr, "AT+ADDLINKADD=");
	strcat(cmdAddr, &zeroFill[myNumChars]);
	strcat(cmdAddr, &myLowerCase[myStart]);
	return (1);  // successful command build
}  // end buildADDLINKADD()

/////////////////////////////////////////////////////////////////////////////////////////////////////////
// buildADDLINKNAME(char * cmdAddr, uint16_t cmdMaxLen)
//    builds a RAM AT+ADDLINKNAME command from user input
//
uint8_t buildADDLINKNAME(char *cmdAddr, uint16_t cmdMaxLen) {
	uint8_t myNumChars = 0;
	char const *zeroFill = "000000000000";
	Serial.println("");
	Serial.println("Enter the name you choose for this device; it is OK to place spaces between words");
	Serial.println("    maximum of 20 characters total");
	Serial.println("To abort adding an auto-connect Bluetooth receiver device to storage, just enter an empty line");
	Serial.print("==> ");
	while (!Serial.available());  // wait
	// reportBlueCom();
	myNumChars = getSerial_chars();
	if (0 == myNumChars) return (0);  // abort
	if (myNumChars > 20) {
		Serial.println("Abort - more than 20 characters");
		return (0);  // abort
	}
	Serial.print("\nYour entry \"");
	Serial.print(inBytes);
	Serial.println("\" was accepted");
	strcpy(cmdAddr, "AT+ADDLINKNAME=");
	strcat(cmdAddr, inBytes);
	return (1);  // successful command build
}  // end buildADDLINKNAME()

/////////////////////////////////////////////////////////////////////////////////////////////////////////
// getSerial_chars()
//    gets character string from USB serial; removes EOL chars; stores in inBytes[] zero terminated
//
//    returns number of characters in inBytes
//
// no code to flag input over-run
// stores zero-terminated string in inBytes
//
uint8_t getSerial_chars() {
	static unsigned char myChar;
	static uint8_t idx = 0;

	idx = 0;
	while (1) {
		if (Serial.available()) {
			myChar = Serial.read();
			if (DEBUG_SERIAL_IN) {
				Serial.print("\n  getSerial_chars got myChar 0x");
				Serial.print(myChar, HEX);
			}                             // end if(DEBUG_SERIAL_IN)
			if (((int)myChar) >= 0x20) {  // if it is space or higher
				Serial.write(myChar);
				if (DEBUG_SERIAL_IN) Serial.print(" >= 0x20 ");
				if ((idx + 2) <= NUMOF(inBytes)) {
					inBytes[idx++] = myChar;
					if (DEBUG_SERIAL_IN) {
						Serial.print("count of inBytes #");
						Serial.println(idx);
					}  // end if(DEBUG_SERIAL_IN)
				} else {
					if (DEBUG_SERIAL_IN) {
						Serial.print(" not stored; idx ");
						Serial.print(idx);
						Serial.print(" not stored; NUMOF(inBytes) ");
						Serial.println(NUMOF(inBytes));
					}  // end if(DEBUG_SERIAL_IN)
				}
				delay(5);
			} else {
				delay(5);
				if (DEBUG_SERIAL_IN) {
					Serial.print(" --- not stored! Count of inBytes #");
					Serial.println(idx);
				}  // end if(DEBUG_SERIAL_IN)
				while (Serial.available()) {
					myChar = Serial.read();
					delay(5);
				}
				break;
			}
		}  // end try to read input to the end of line
	}

	inBytes[idx] = 0;
	if (DEBUG_SERIAL_IN) {
		Serial.print("\n  getSerial_chars idx ");
		Serial.print(idx);
		Serial.print(" inBytes[idx] 0x");
		Serial.print(inBytes[idx], HEX);
		Serial.print(" inBytes |");
		Serial.print(inBytes);
		Serial.println("|");
	}  // end if(DEBUG_SERIAL_IN)
	return (idx);
}  // end getSerial_chars()

/////////////////////////////////////////////////////////////////////////////////////////////////////////
// getSerial_uint8_t()
//    gets single-digit decimal number from USB serial; returns the number itself (not ASCII)
//
uint8_t getSerial_uint8_t() {
	getSerial_chars();
	if (DEBUG_SERIAL_IN) {
		Serial.print("\n  getSerial_uint8_t inBytes[0] 0x");
		Serial.print(inBytes[0], HEX);
		Serial.print(" converted to ");
		Serial.println(uint8_t(inBytes[0] - 0x30), HEX);
	}                                     // end if(DEBUG_SERIAL_IN)
	return (uint8_t(inBytes[0] - 0x30));  // subtract ASCII 0
}  // end getSerial_uint8_t()

/////////////////////////////////////////////////////////////////////////////////////////////////////////
// sendBlueCmd( char * cmd )
//    Sends one AT-style zero-terminated string to the Bluetooth module
//
void sendBlueCmd(char *cmd) {
	Serial.println(cmd); // send this before sending to device
	// BTSerial.println(cmd);
	while (*cmd) {
		BTSerial.write(*cmd);
		cmd++;
	}
	BTSerial.write(0x0d);
	BTSerial.write(0x0a);
	loopReportBlueCom();
}  // end sendBlueCmd()

/////////////////////////////////////////////////////////////////////////////////////////////////////////
// reportBlueCom()
//    Reports back any response or scan output from the Bluetooth module
//    Returns number of characters seen
//
unsigned int reportBlueCom() {
	unsigned int idx = 0;
	unsigned int odx = 0;

	while (BTSerial.available()) inBytes[idx++] = BTSerial.read();
	if (idx > 0) {
		odx = 0;
		for (odx = 0; odx < idx; odx += 1) {
			Serial.write(inBytes[odx]);
			delay(5); // Waiting time to prevent garbled characters
		}
	}  // if anything received from Bluetooth chip
	return (idx);
}  // end reportBlueCom()

/////////////////////////////////////////////////////////////////////////////////////////////////////////
// loopReportBlueCom()
//    Loops reporting back any response or scan output from the Bluetooth module
//    Returns number of characters seen on the last loop
//
unsigned int loopReportBlueCom() {
	int loopIdx;
	unsigned int numBytes;
	for (loopIdx = 0; loopIdx < NUMWAIT; loopIdx += 1) {
		numBytes = reportBlueCom();
		delay(5);
	}
	return (numBytes);
}  // end loopReportBlueCom()
$ pio init -b metro
$ pio run -t upload
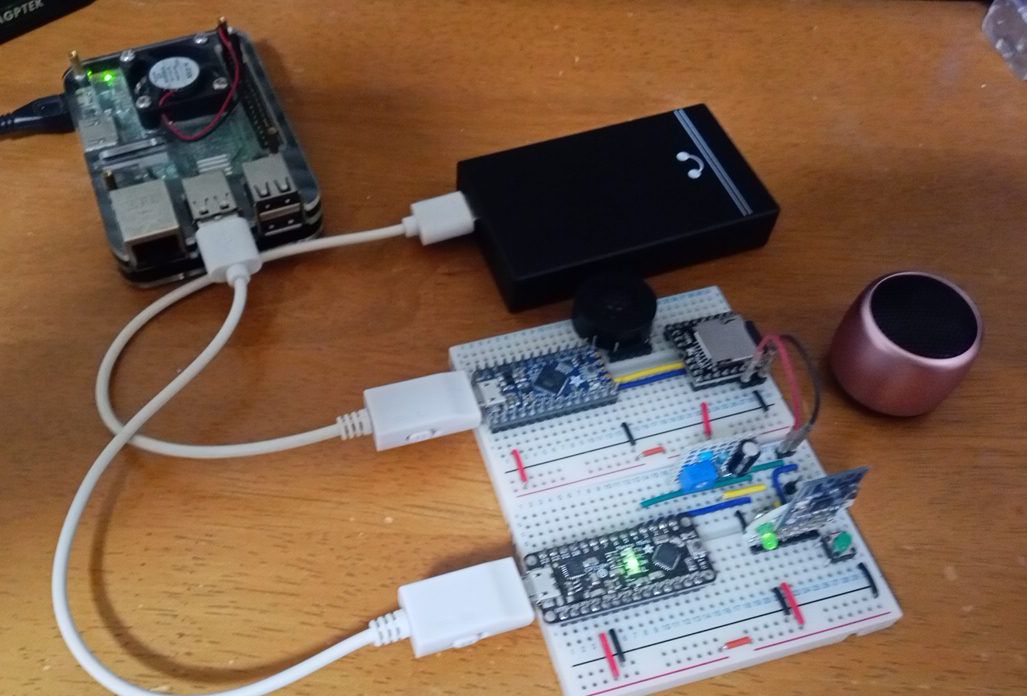
$ pio device monitor -p /dev/ttyUSB0 -b 115200
電源を入れるとデバイスに接続したことがない場合はスキャンが実行されます。
電源を切り、再び電源を入れると、最後に接続していたデバイスに自動的に接続されます。
接続が確立されない場合、自動接続リスト(VMLINK)に登録されたMACアドレスがスキャンされ、見つかったMACアドレスのデバイスに接続されます。
CONボタンを押すと、現在の自動接続リストも削除されます。
外部オーディオ機器からの入力信号のON/OFF制御はありません。
Bluetoothスピーカーと接続後は入力信号の有無に関わらずオーディオ送信されます。
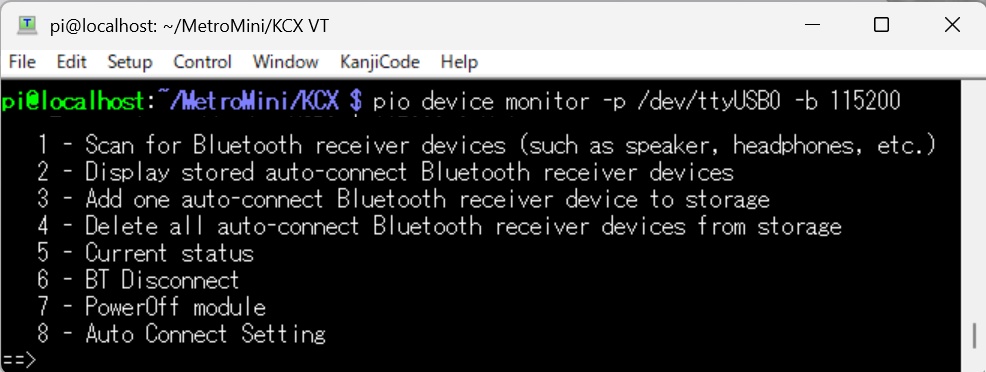
変更したプログラムでは、メニュー番号選択以外にコマンドプロンプトからKCX用のATコマンドを入力できるようにしています。
●Bluetoothスピーカーを検索する際は、1番を選択します
AT+
OK+
AT+RESET
OK+RESET
?VM Reset2
Delete_Vmlink
POWER ON
SCAN....
AT+
OK+
MacAdd:014d0b2d4241,Name:MT
CON ONE
CONNECT=>MacAdd:014d0b2d4240,Name:MT
AT+PAIR
OK+PAIR
※AT+RESETを実行すると、登録済みの自動接続MACアドレスが消去されてしまうので注意が必要です
※検出された16進表記12文字(2文字x6個)の並びはスマホなどで表記されるMACアドレスとは順番が逆転しています
●自動接続用MACアドレスを登録する際は、3番を選択します
Enter the unique MAC address for the Bluetooth speaker or headphones;
it starts with 0x, upper or lower case does not matter;
maximum of 12 characters after the 0x,
To abort adding an auto-connect Bluetooth receiver device to storage, just enter an empty line
==> 014d0b2d4241 ← "0x"を省いて入力します
Your entry "014d0b2d4241" was accepted
Enter the name you choose for this device; it is OK to place spaces between words,
maximum of 20 characters total
To abort adding an auto-connect Bluetooth receiver device to storage, just enter an empty line
==> MT
●8番のAuto Connect Settingは新たに追加した項目です
AT+RESET実行などで登録済の自動接続用MACアドレスを消去してしまった場合に選択します。
ご自身の環境に合わせMACアドレスをソースコード内に追記してください。
下記の例では2個のMACアドレスを登録しています。
AT+
OK+
AT+DISCON
OK+DISCON
SCAN....
MacAdd:0f1939d72316,Name:HW-BT
CON LAST
AT+DELVMLINK
Delete_Vmlink
AT+ADDLINKADD=0f1939d72316
OK+ADDLINKADD=0f1939d72316
BT_ADD_NUM=01
BT_NAME_NUM=00
Auto_link_Add:null
MEM_MacAdd 00:0
AT+ADDLINKNAME=HW-BT
OK+ADDLINKNAME=HW-BT
BT_ADD_NUM=01
BT_NAME_NUM=01
Auto_link_Add:null
MEM_MacAdd 00:0
AT+ADDLINKADD=014d0b2d4241
OK+ADDLINKADD=014d0b2d4241
BT_ADD_NUM=02
BT_NAME_NUM=01
Auto_link_Add:null
MEM_MacAdd 00:0
AT+ADDLINKNAME=MT
OK+ADDLINKNAME=MT
BT_ADD_NUM=02
BT_NAME_NUM=02
Auto_link_Add:null
MEM_MacAdd 00:0
その他の操作の一例です。
==> 2
2=DISPLAY
AT+
OK+
AT+VMLINK?
OK+VMLINK
BT_ADD_NUM=02
BT_NAME_NUM=02
Auto_link_Add:null
MEM_MacAdd 00:0f1939d72316
==> 4
4=DELETE ALL
AT+
OK+
AT+DISCON
OK+DISCON
SCAN....
AT+DELVMLINK
Delete_Vmlink
AT+RESET
OK+RESET
??POWER ON
AT+
OK+
AT+VMLINK?
OK+VMLINK
BT_ADD_NUM=00
BT_NAME_NUM=00
Auto_link_Add:nvll
==> 5
5=STATUS
AT+
OK+
AT+GMR?
OK+VERS:KCX_BT_RTX_V1.4
AT+BAUD?
OK+BAUD=4,BAUD=115200
AT+STATUS?
OK+STATUS:1
==> 6
6=Disconnect
AT+
OK+
AT+DISCON
OK+DISCON
==> 7
7=PowerOff module
SCAN....
MacAdd:014d0b2d4241,Name:MT
CON LAST
AT+
OK+
AT+POWER_OFF
OK+POWEROFF_MODE
|
 Raspberry Pi(ラズベリー パイ)は、ARMプロセッサを搭載したシングルボードコンピュータ。イギリスのラズベリーパイ財団によって開発されている。
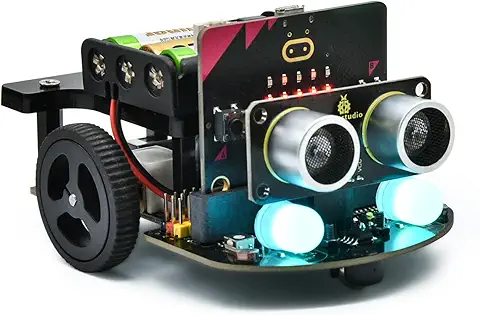 KEYESTUDIO Micro:bit V2ロボットスターターキット (マイクロビットなし) MakecodeとPython用
動き、光と音の使い方、障害物の検知と回避方法、線をたどり、IRリモコンとアプリでコントロールする方法を学びます。
 Maqueen Lite V5 micro:bit ロボットキット STEM用(ライントレース&障害物回避)
Maqueen Lite V5 STEMロボットは、事前調整済みのライントレースアルゴリズム、耐衝撃モーター、開封即使用可能な設計で、ストレスを解消します。
 たいていのことは100日あれば、うまくいく。長田英知著
「時間がなくて、なかなか自分のやりたいことができない」
「一念発起して何かを始めても、いつも三日坊主で終わってしまう」
「色んなことを先延ばしにしたまま、時間だけが過ぎていく」
そこで本書では、そんな著者が独自に開発した、
まったく新しい目標達成メソッド「100日デザイン」について、
その知識と技術を、余すところなくご紹介します。
 まんがで納得ナポレオン・ヒル 思考は現実化する
OLとして雑務をこなす日々に飽き足らず、科学者だった父が残した薬品を商品化すべく、起業を決意した内山麻由(27)。彼女はセミナーで知り合った謎の女性からサポートを得ながら、彼女と二人三脚でナポレオン・ヒルの成功哲学を実践し、さまざまな問題を乗り越えていく。
ヒル博士の<ゴールデンルール>に従い、仕事に、恋に全力疾走する彼女の、成功への物語。
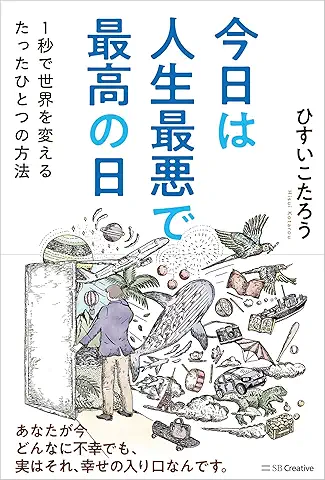 今日は人生最悪で最高の日 1秒で世界を変えるたったひとつの方法 ひすいこたろう著
偉人の伝記を読むと、最悪な日は、不幸な日ではなく、新しい自分が始まる日であることがわかります。最悪な出来事は、自分の人生が、想像を超えて面白くなる兆しなのです。偉人伝を読むことで、このときの不幸があったおかげで、未来にこういう幸せがくるのかと、人生を俯瞰する視線が立ち上がるのです。
 ご飯は私を裏切らない heisoku著
辛い現実から目を背けて食べるご飯は、いつも美味しく幸せを届けてくれる。
29歳、中卒、恋人いない歴イコール年齢。バイト以外の職歴もなく、短期バイトを転々とする日々。ぐるぐると思索に耽るけど、ご飯を食べると幸せになれる。奇才の新鋭・heisokuが贈るリアル労働グルメ物語!
 【最新版Gemini 3に対応!】できるGemini (できるシリーズ)
Geminiを「最強の知的生産パートナー」として使いこなすための、実践的なノウハウを凝縮した一冊です。
基本的な操作方法から、具体的なビジネスシーンでの活用、日々の業務を自動化するGoogle Workspaceとの連携、さらには自分だけのオリジナルAIを作成する方法まで余すところなく解説します。
 Rustプログラミング完全ガイド 他言語との比較で違いが分かる!
Rustの各手法や考え方を幅広く解説!
500以上のサンプルを掲載。実行結果も確認。
全24章の包括的なチュートリアル。
 ポチらせる文章術
販売サイト・ネット広告・メルマガ・ブログ・ホームページ・SNS…
全WEB媒体で効果バツグン!
カリスマコピーライターが教える「見てもらう」「買ってもらう」「共感してもらう」すべてに効くネット文章術
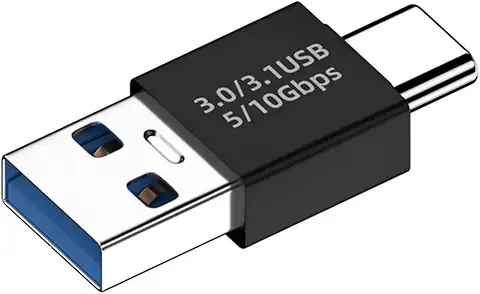 小型で便利な Type-C アダプター USB C オス - USB3.1 オスアダプター
Type-C端子のマイコンボードをこのアダプタを介して直接Raspberry Piに挿すことができます。ケーブルなしで便利なツールです。
 Divoom Ditoo Pro ワイヤレススピーカー
15W高音質重低音/青軸キーボード/Bluetooth5.3/ピクセルアート 専用アプリ/USB接続/microSDカード
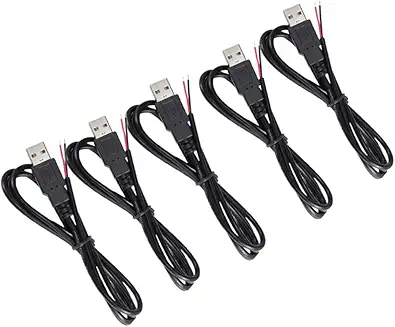 電源供給USBケーブル スリム 【5本セット】
USB電源ケーブル 5V DC電源供給ケーブル スリム 【5本セット】 電源供給 バッテリー 修理 自作 DIY 電子工作 (100cm)
|